HelpCrunch does not use a separate ticketing module for email support. Instead, it follows a “chat as a ticket” approach: every customer conversation acts as a ticket, while live chat and email are communication channels within the same thread.
This unified ticketing model gives your support team all the essential helpdesk tools without separating live chat conversations from email tickets.
Table of contents
- How the “chat as a ticket” approach works
- Why use unified chat and email ticketing?
- Common email ticketing use cases
- How to set up email ticketing for multiple email addresses
- Managing incoming email tickets
- Conclusion
How the “chat as a ticket” approach works
A customer can start a chat conversation through your website chat and then go offline. The agent can continue conversation by switching to email and sending a follow-up directly from the same chat window.
The email appears in the existing conversation and is also delivered to the customer’s inbox. When the customer replies, the response is routed back to the same chat in HelpCrunch.
As a result, your team can move between live chat and email without creating a new ticket, opening another helpdesk tool, or losing the previous conversation history.
A HelpCrunch conversation can also consist entirely of email messages. For example:
-
A customer sends an email to [email protected].
-
The message is forwarded to your HelpCrunch inbox.
-
HelpCrunch creates a conversation for the incoming email.
-
An agent opens the conversation and clicks Reply below the incoming email.
-
The response is delivered to the customer by email.
-
Further replies continue in the same conversation.
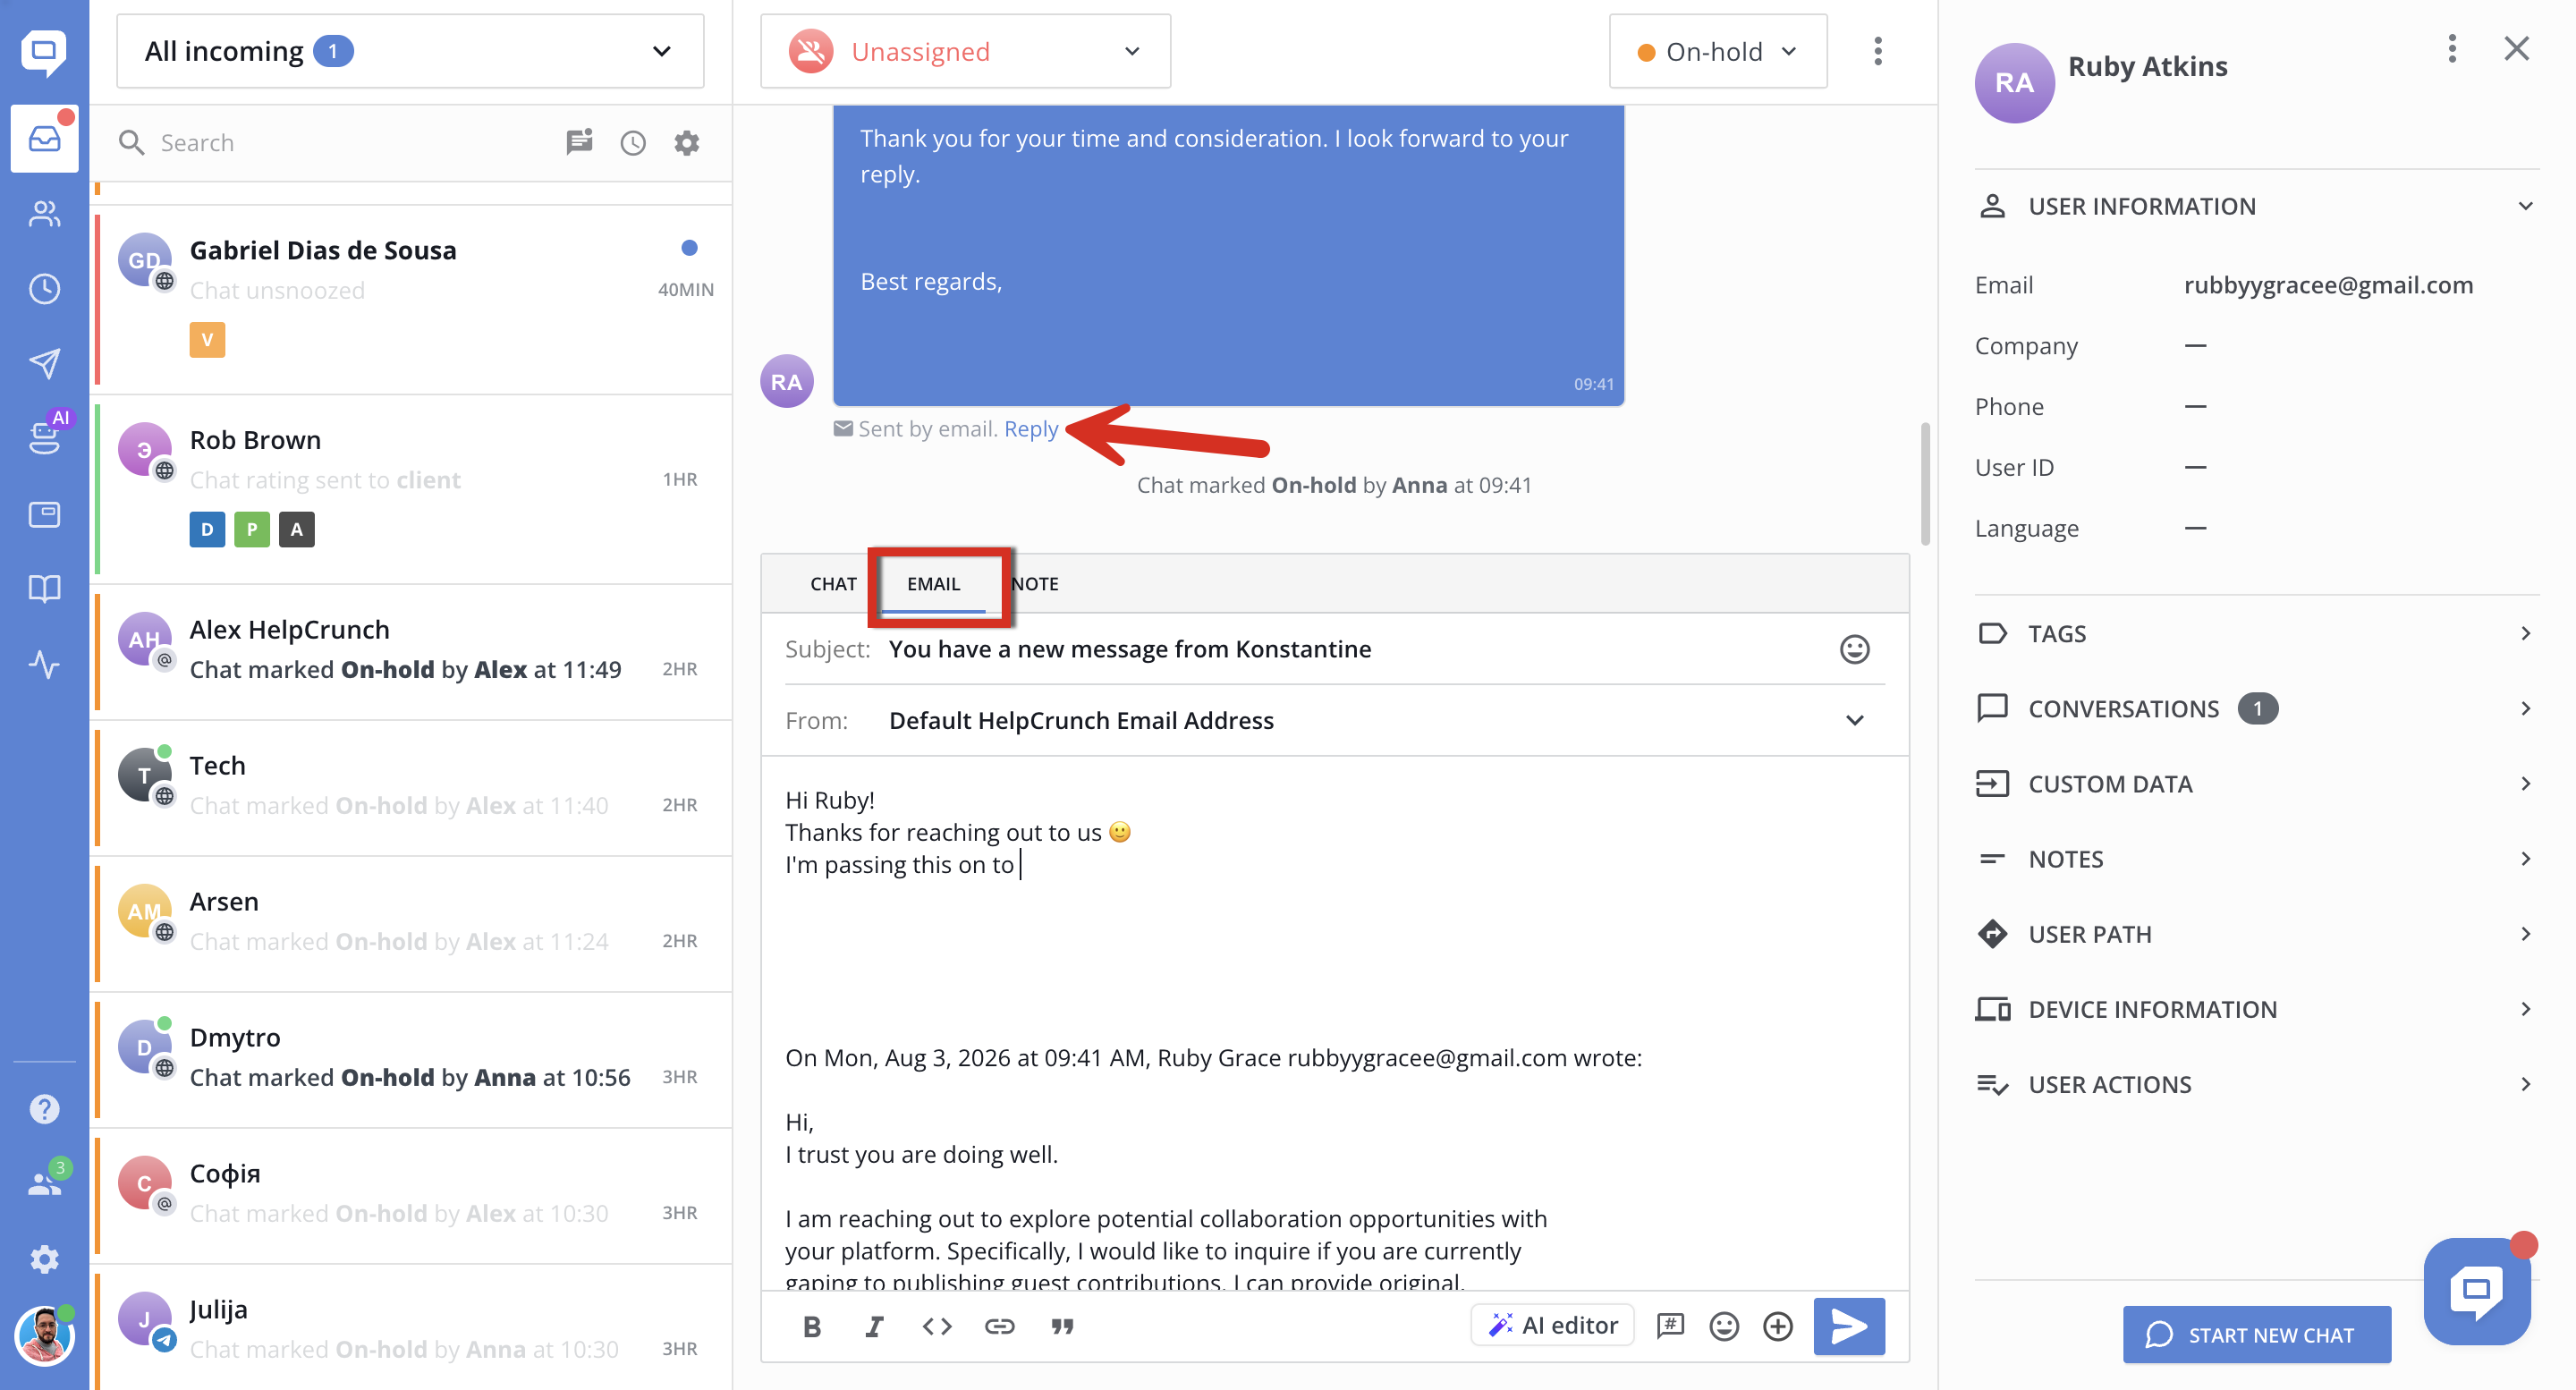
Even though the conversation is displayed in the same chat window in HelpCrunch, it works as an email ticket and supports the standard email ticketing workflow.
Why use unified chat and email ticketing?
Traditional helpdesk software may keep live chat and email ticketing in separate modules. This can result in fragmented conversation histories, duplicate tickets, and additional work for support agents.
HelpCrunch combines both channels in one shared inbox, providing several advantages:
- One customer conversation across channels – Agents can see the customer’s live chat and email communication in one place without searching through separate sections of the platform.
- Easy email follow-ups – If a customer leaves the website, the agent can continue the conversation by email without creating a separate support ticket.
- Fewer duplicate tickets – Customer replies return to the corresponding conversation, keeping related chat and email messages together.
- Familiar helpdesk workflow – Each conversation can be managed using assignees, departments, statuses, tags, internal notes, custom inboxes, assignment rules, search, filters, and performance reports.
- Centralized email management – Multiple business addresses, such as support, sales, billing, or partnerships, can be forwarded to HelpCrunch and managed from one shared inbox.
Common email ticketing use cases
The “chat as a ticket” model supports various customer service and email ticket management workflows:
- Live chat followed by email – If a customer leaves the website, the agent can send an email from the existing conversation, and the customer’s reply returns to the same thread.
- Email-only customer support – Emails sent to [email protected] can be forwarded to HelpCrunch and managed as tickets without using a separate mailbox.
- Multiple company email addresses – Emails sent to addresses such as [email protected] and [email protected] can be routed to the appropriate departments and custom inboxes.
- Subject-based email ticket routing – Emails containing words such as “bug,” “invoice,” or “demo” in their subject can be automatically assigned to specific departments or agents.
- Sender-based email management – Requests from selected customers, partners, or company domains can be routed to a dedicated team or prioritized automatically.
How to set up email ticketing for multiple email addresses
Suppose your company receives customer emails through two addresses:
-
support@yourcompany.com
-
sales@yourcompany.com
You want support emails to appear in a Support inbox, sales emails to appear in a Sales inbox, and each department to have separate helpdesk analytics.
Follow the steps below to build this email ticketing workflow.
Step 1. Forward your email addresses to HelpCrunch
First, forward both company email addresses to the default email address provided in your HelpCrunch account.
If you use Gmail:
-
Open Gmail and go to Settings → See all settings.
-
Open the Forwarding and POP/IMAP tab.
-
Click Add a forwarding address.
-
Enter your organization's default email address which is available in your HelpCrunch account. Just go to Settings→Channels→Email and copy it from there (it will look like support@yourdomain.helpcrunch-mail.com)
-
Confirm the address using the verification email delivered to your HelpCrunch inbox.
-
Return to Gmail, enable forwarding and save the changes.
Repeat the process for every business email address you want to manage through the HelpCrunch helpdesk.
Note: Avoid forwarding the same address that you use for HelpCrunch email notifications. Otherwise, a notification may be forwarded back to HelpCrunch and create an email loop.
For detailed setup instructions, refer to Forward support emails to your HelpCrunch inbox.
Step 2. Create departments
Next, create departments that correspond to your email management workflow.
Go to Settings → Team → Departments and create the following departments:
-
Support
-
Sales
Add the appropriate team members to each department. These departments will be used to route incoming email tickets, build custom inboxes, and generate separate helpdesk reports.
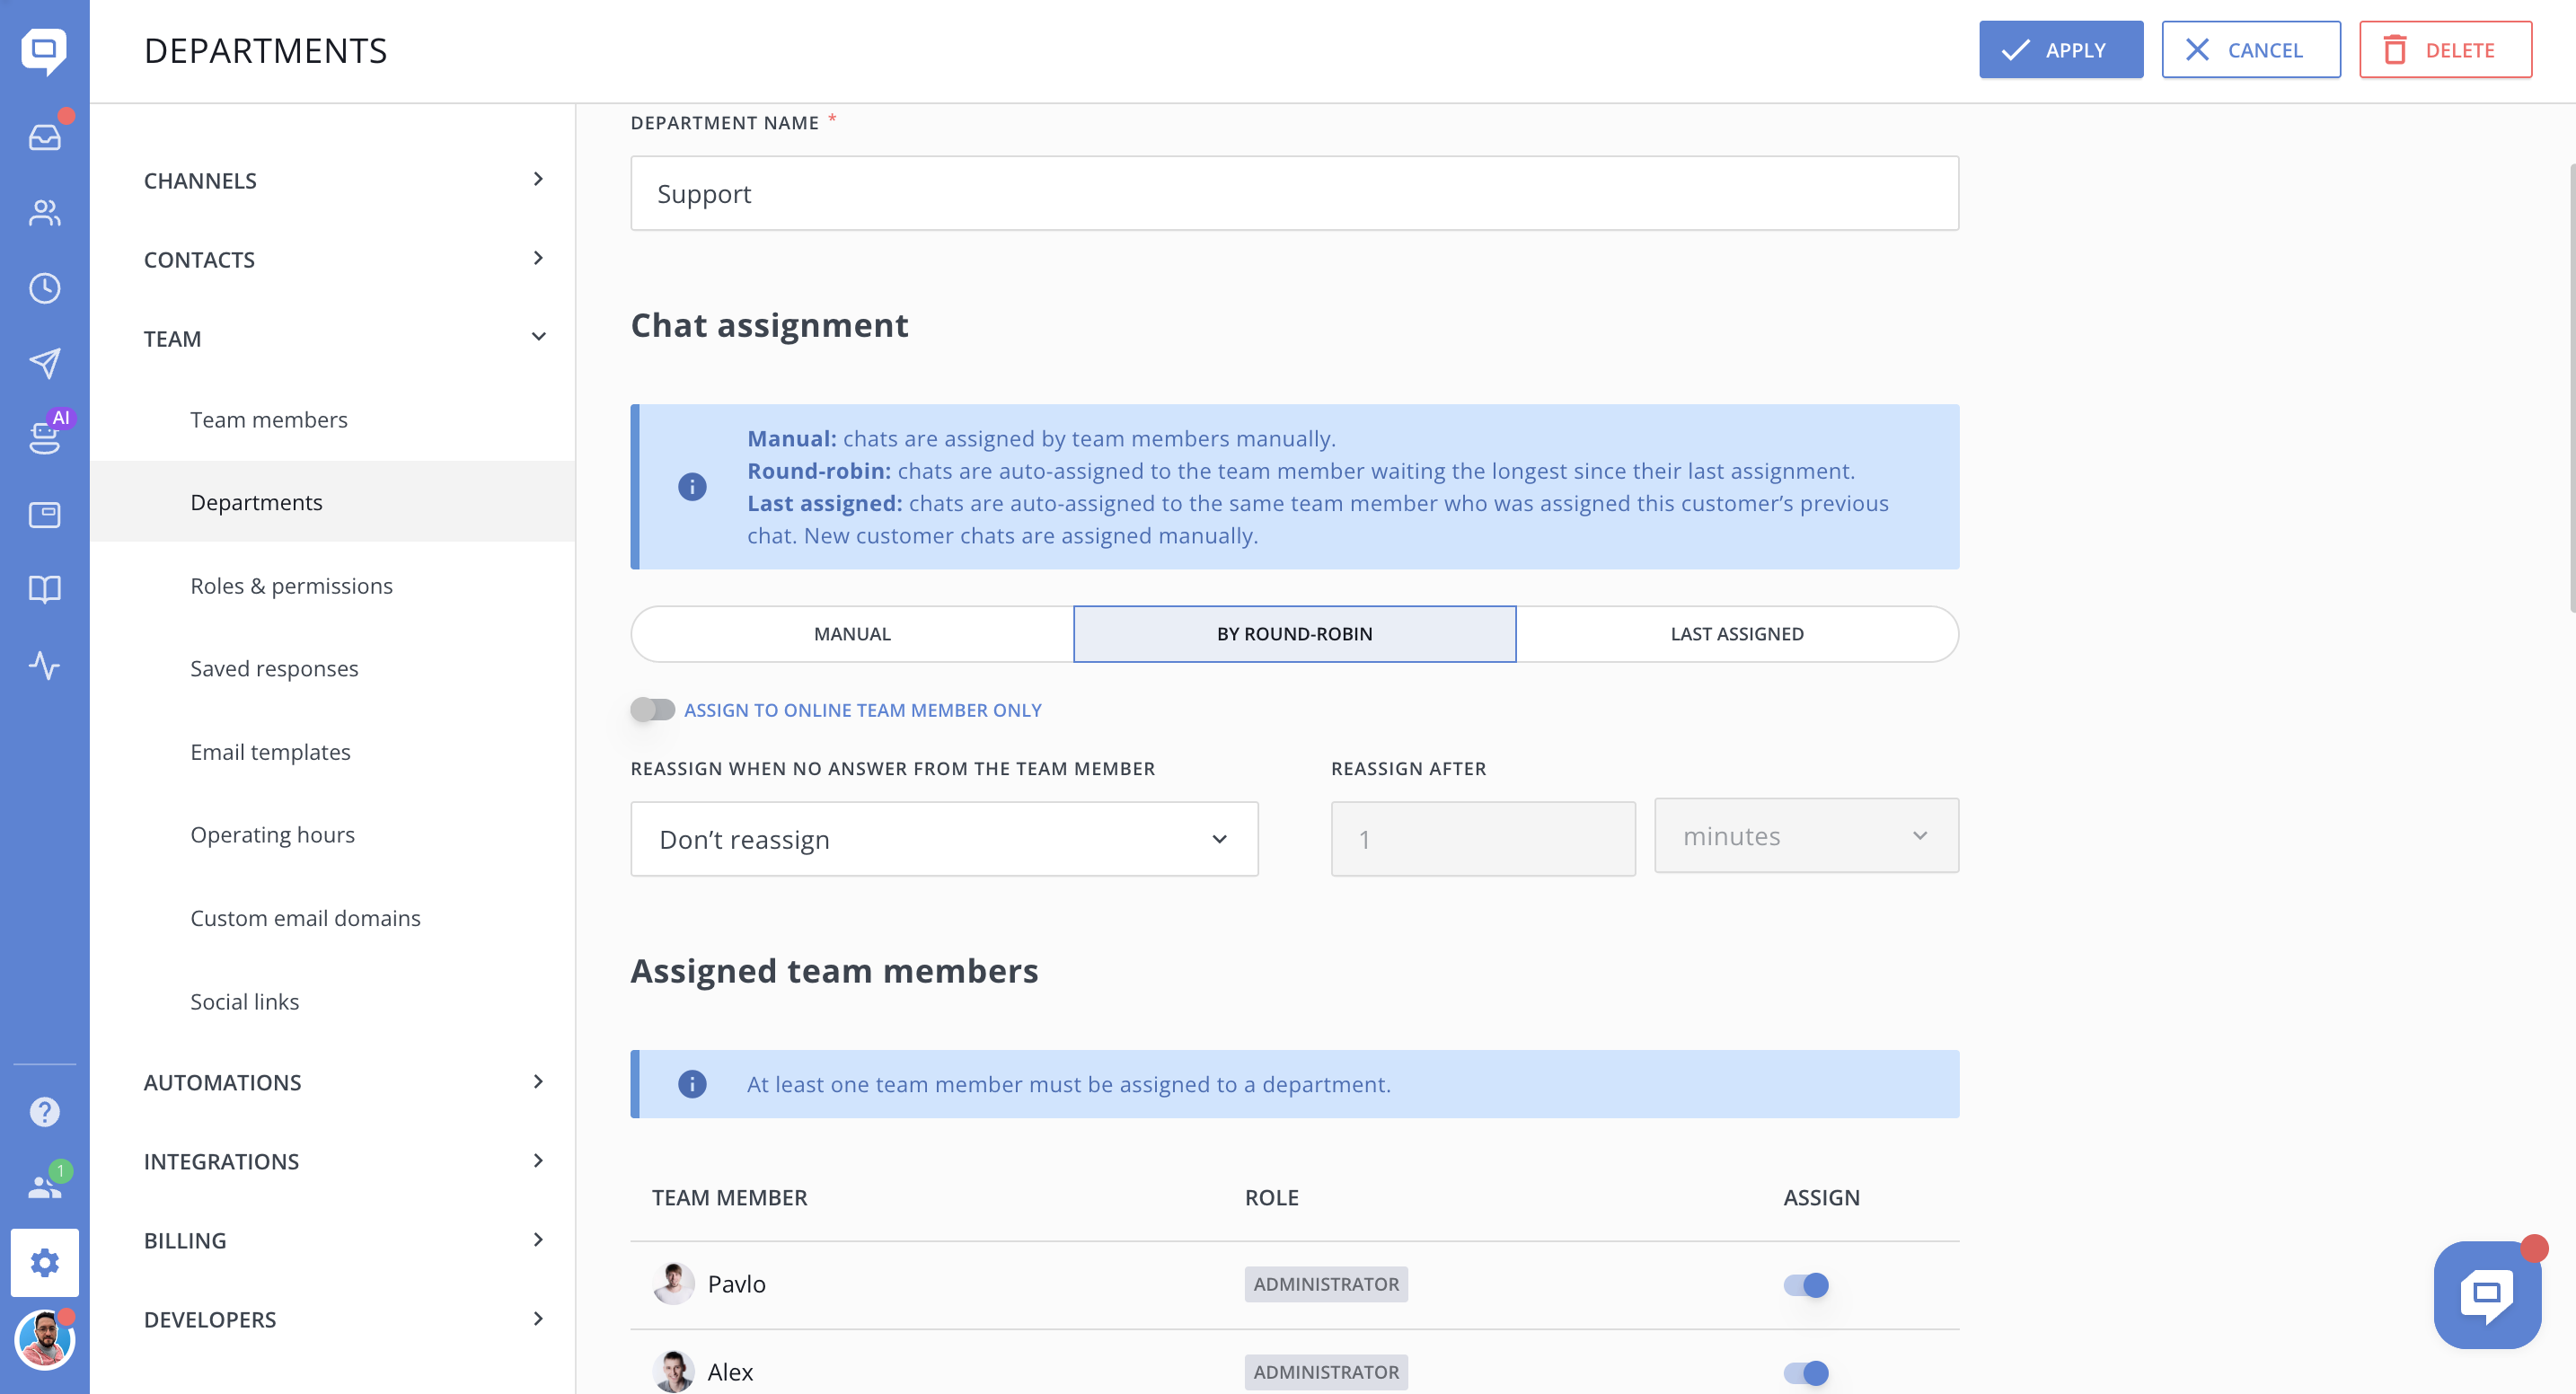
Read How to create or edit departments for more information.
Step 3. Route incoming email tickets with assignment rules
Go to Settings → Automations → Assignment rules and create rules for incoming emails.
Assignment rules can use the following email fields:
-
Email from identifies the sender.
-
Email to identifies the company address that received the original email.
-
Email subject checks the subject line for specific words or phrases.
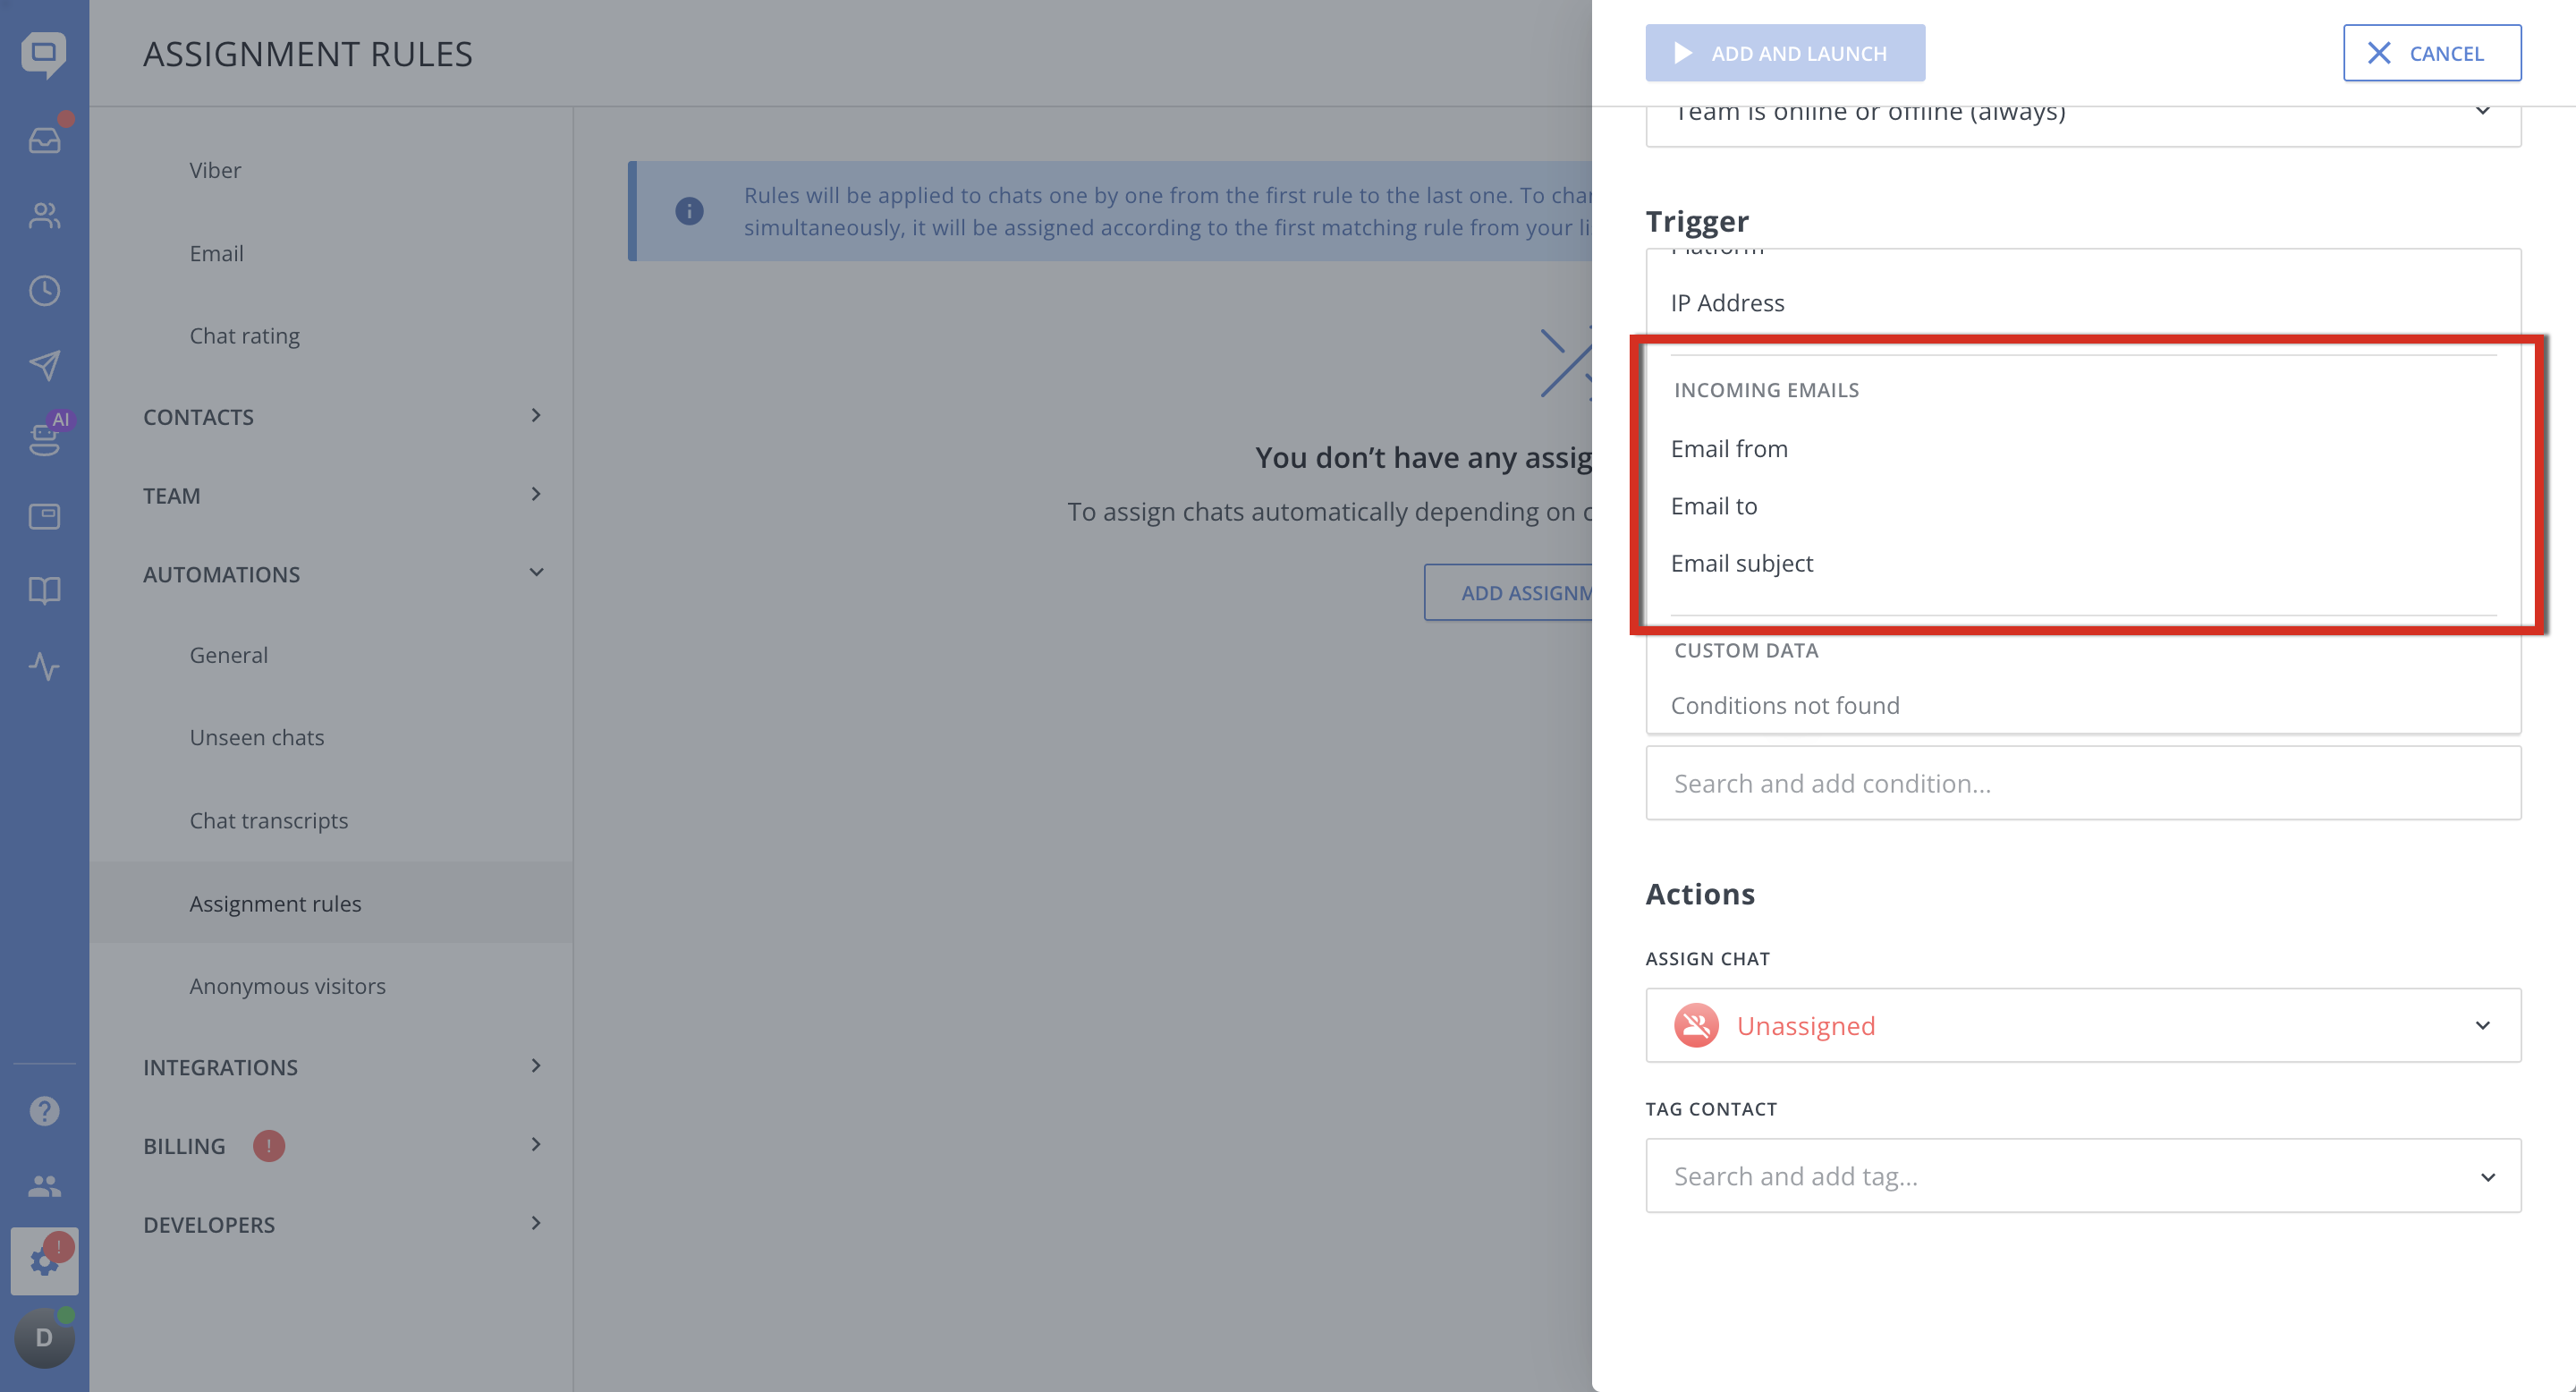
Here is an example ticket routing setup:
| Condition | Action |
|---|---|
| Email to contains [email protected] | Assign to the Support department |
| Email to contains [email protected] | Assign to the Sales department |
| Email subject contains "bug" | Assign to the Support department |
| Email subject contains "demo" | Assign to the Sales department |
| Email from contains a @amazon.com | Assign to the relevant department or agent |
Place specific rules above broader rules. HelpCrunch checks assignment rules in order and applies the first matching rule.
For example, if emails with “bug” in the subject must always go to Support, place this rule above the general rule for [email protected].
Assignment rules are available on the Pro and Unlimited plans. Learn more in Assignment rules.
Step 4. Create custom helpdesk inboxes
Once email tickets are assigned to departments, create a custom inbox for each department.
- Open the inbox selector and click Add new inbox.
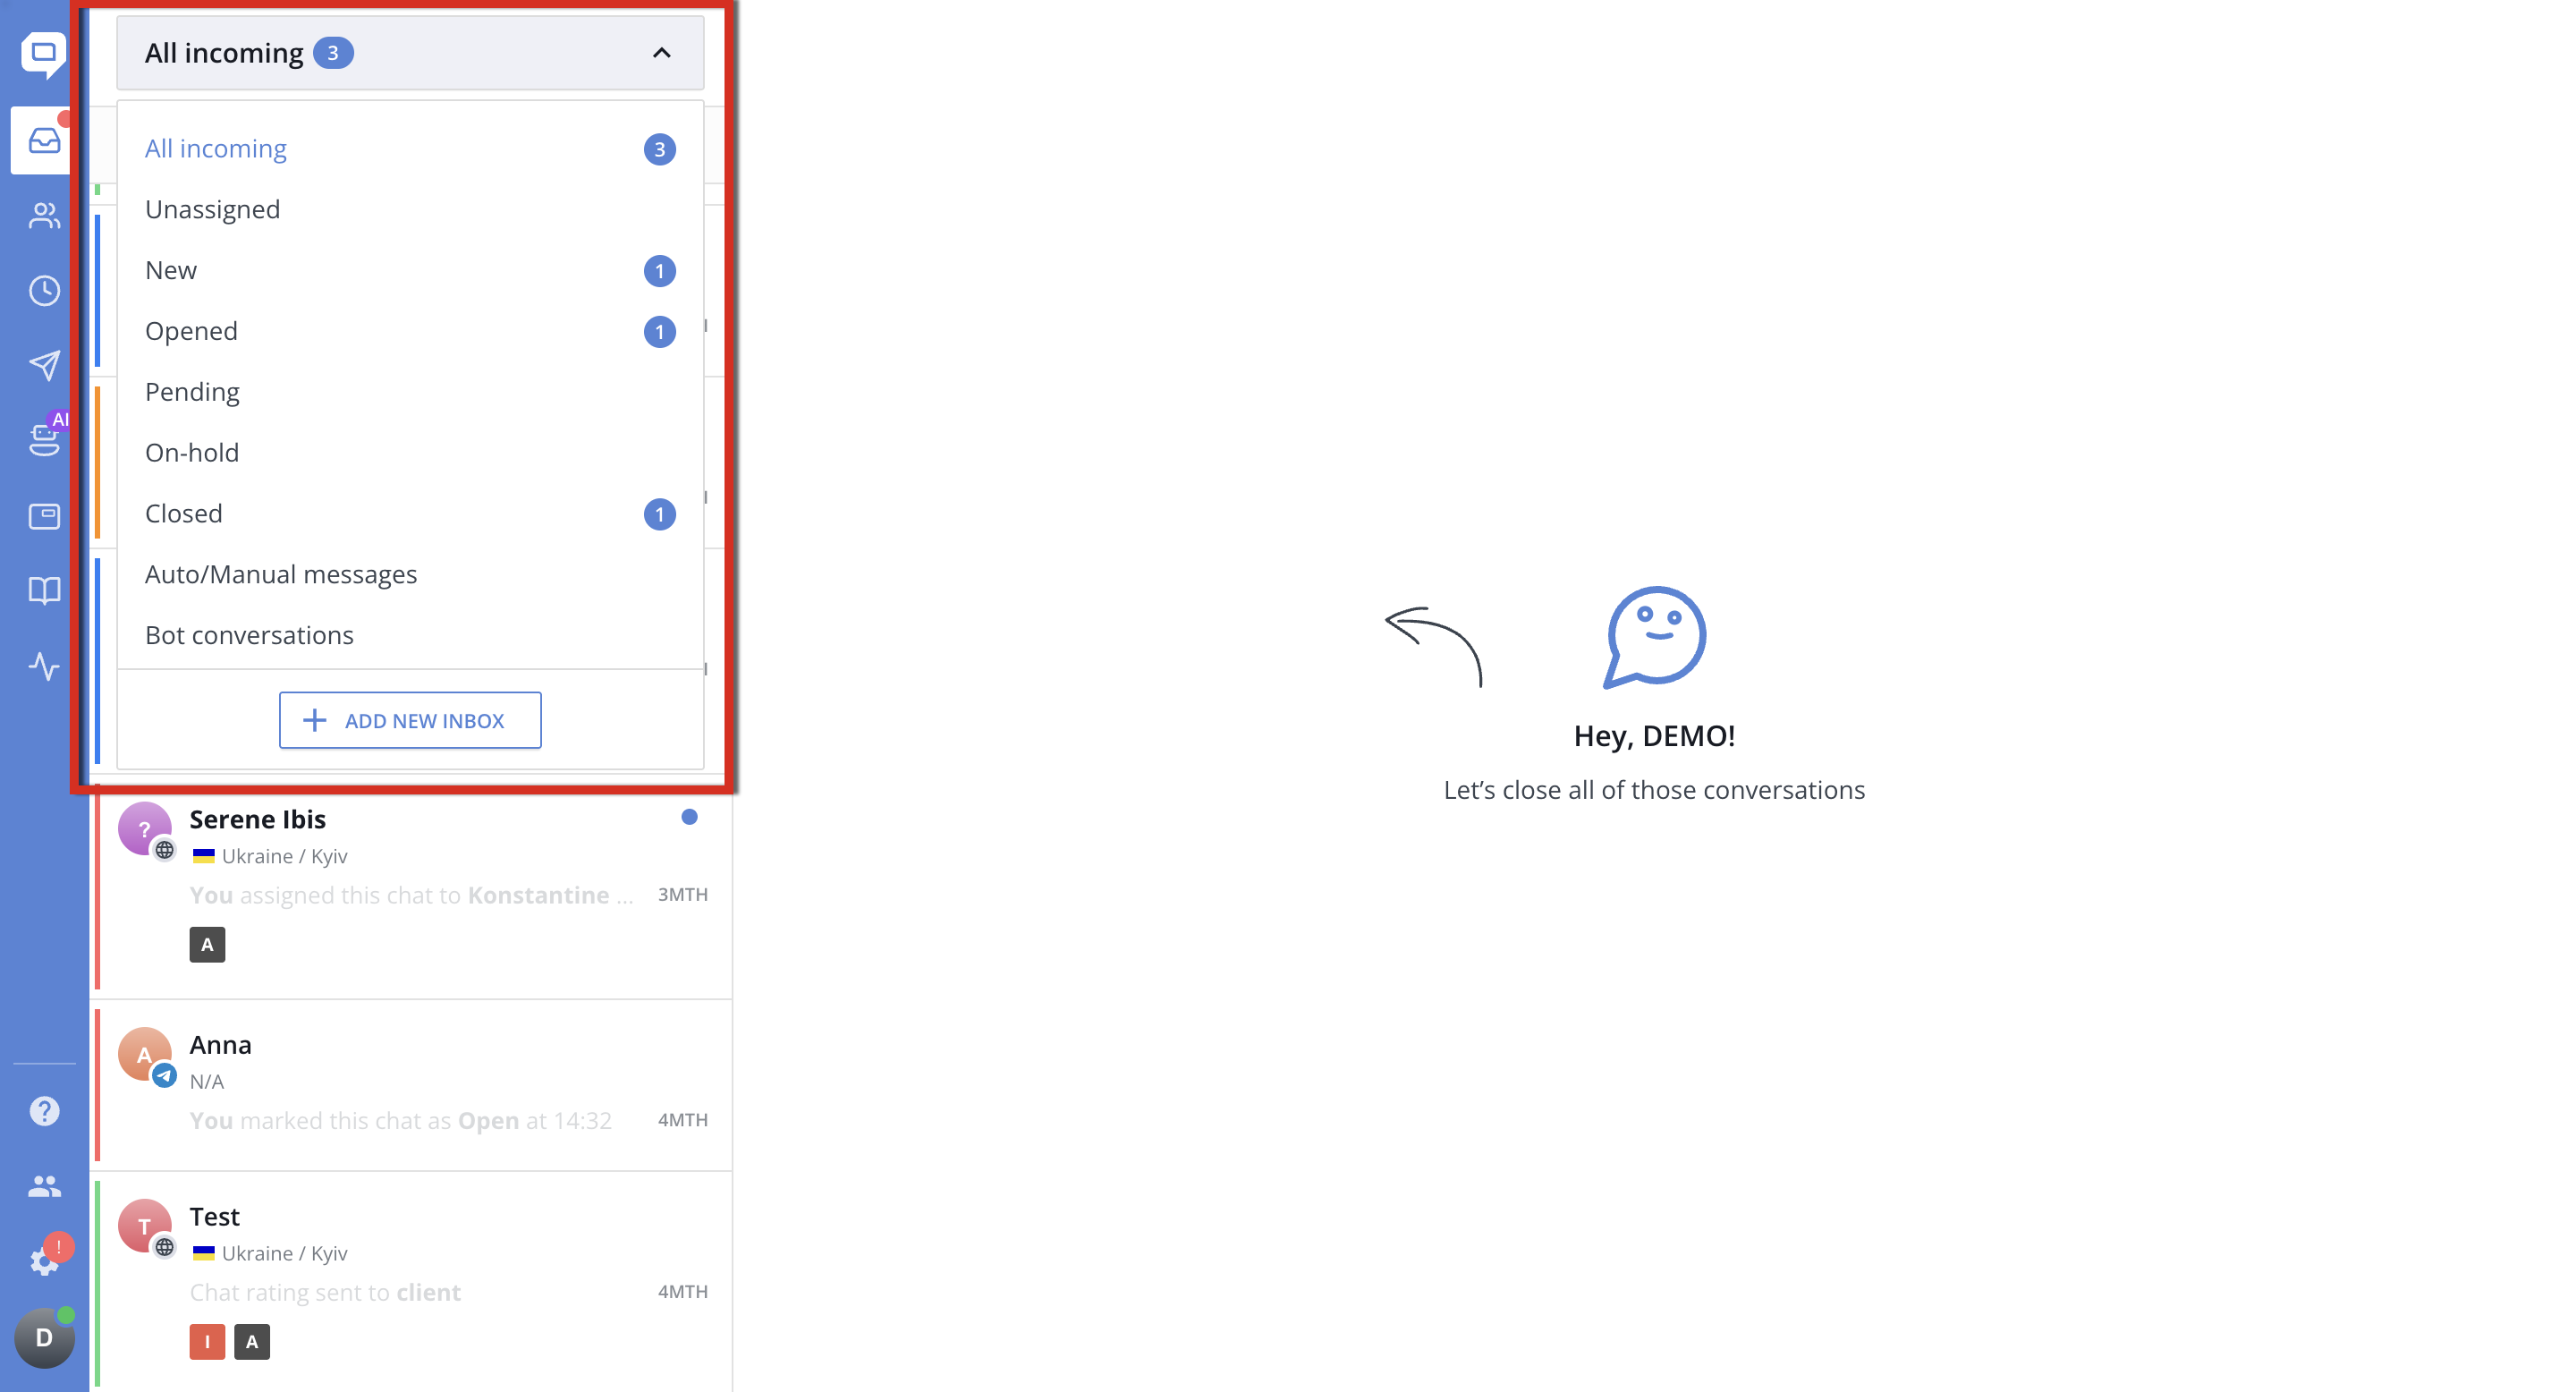
- Name it Support emails inbox with the filter: Department is Support
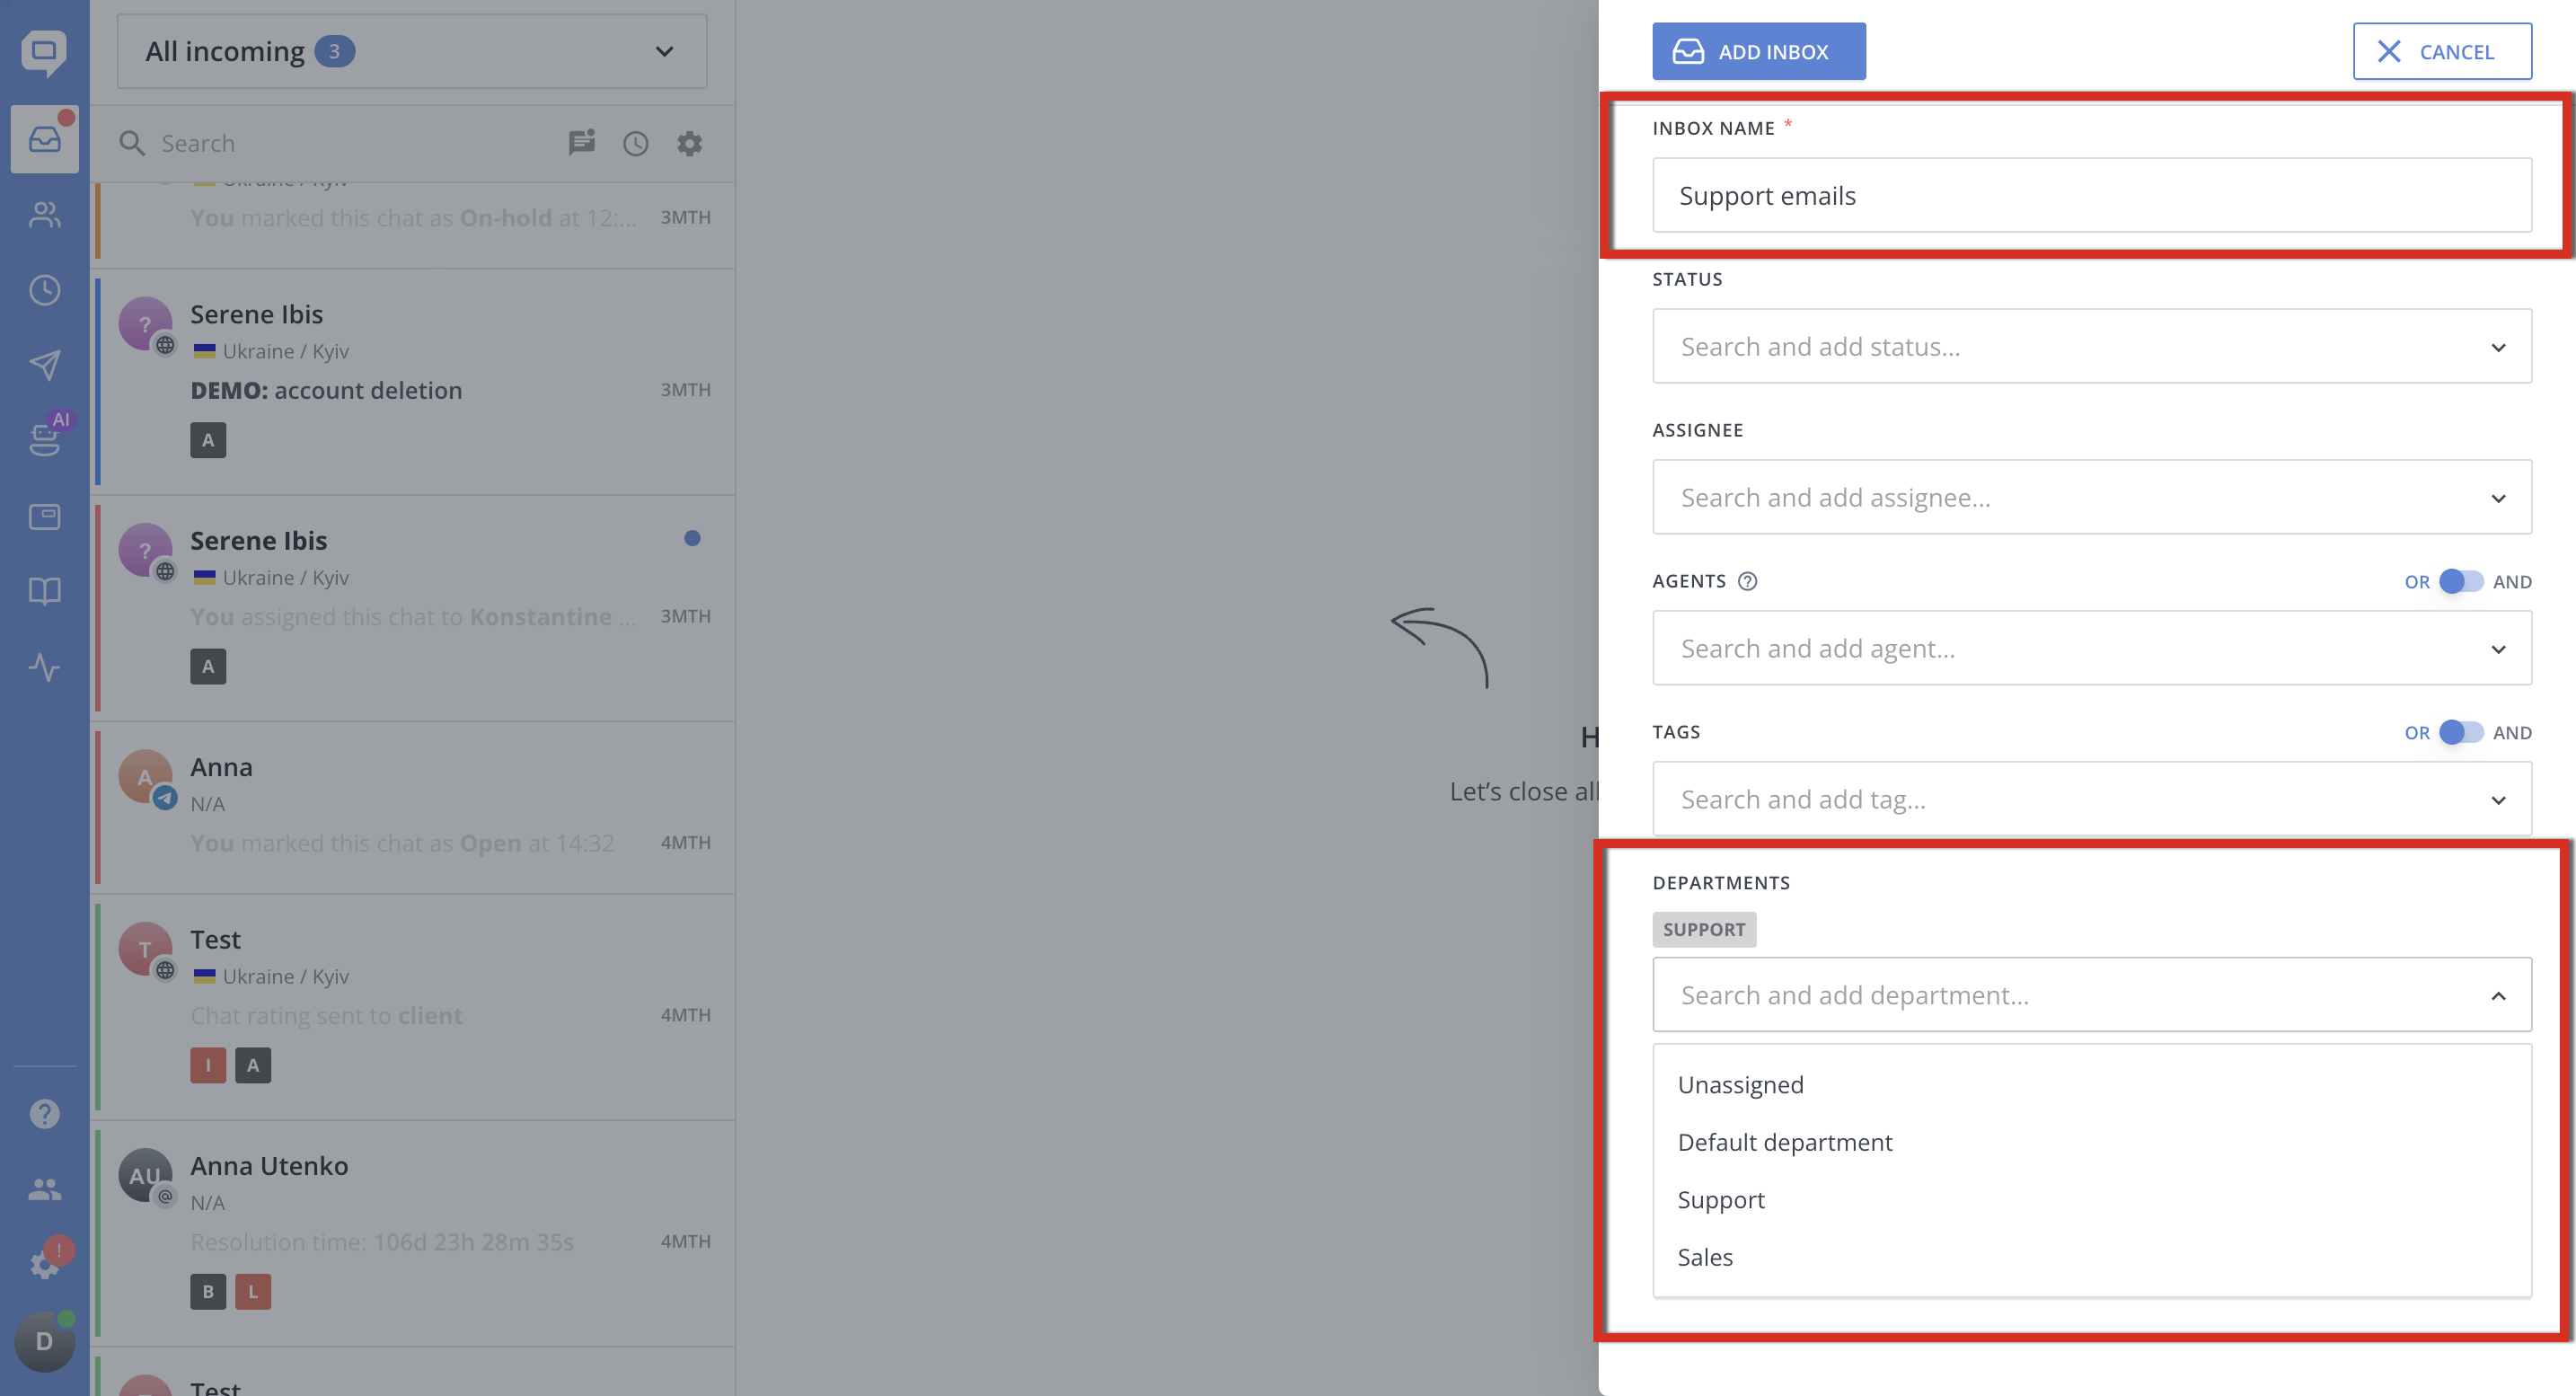
- Save it by clicking Add inbox button on top and repeat the same process for the Sales emails inbox. But in this case select the department Sales in the filter.
All conversations assigned to the Support department will appear in the Support emails inbox. Conversations assigned to Sales will appear in the Sales emails inbox.
You can combine department filters with additional ticketing filters such as:
-
Status
-
Assignee
-
Agent
-
Tag
-
Website widget or application
For example, you can create a custom helpdesk inbox that displays only new and open email tickets assigned to Support.
See Create custom inboxes for the complete setup process.
Step 5. Set up custom outbound email addresses
By default, HelpCrunch provides an email address your agents can use to send messages. However, you can add your company addresses so that customers receive replies from recognizable senders such as:
Go to Settings → Team → Custom Email Domains, add the required email addresses, and verify your domain by adding the provided DNS records.
You can also assign specific team members to each outbound address. Once the domain is verified, authorized agents can select the appropriate sender address when replying from the HelpCrunch inbox.
For example:
-
Support agents reply from [email protected].
-
Sales representatives reply from [email protected].
Customer replies will return to the corresponding conversation in HelpCrunch, keeping the full email ticket history in one place.
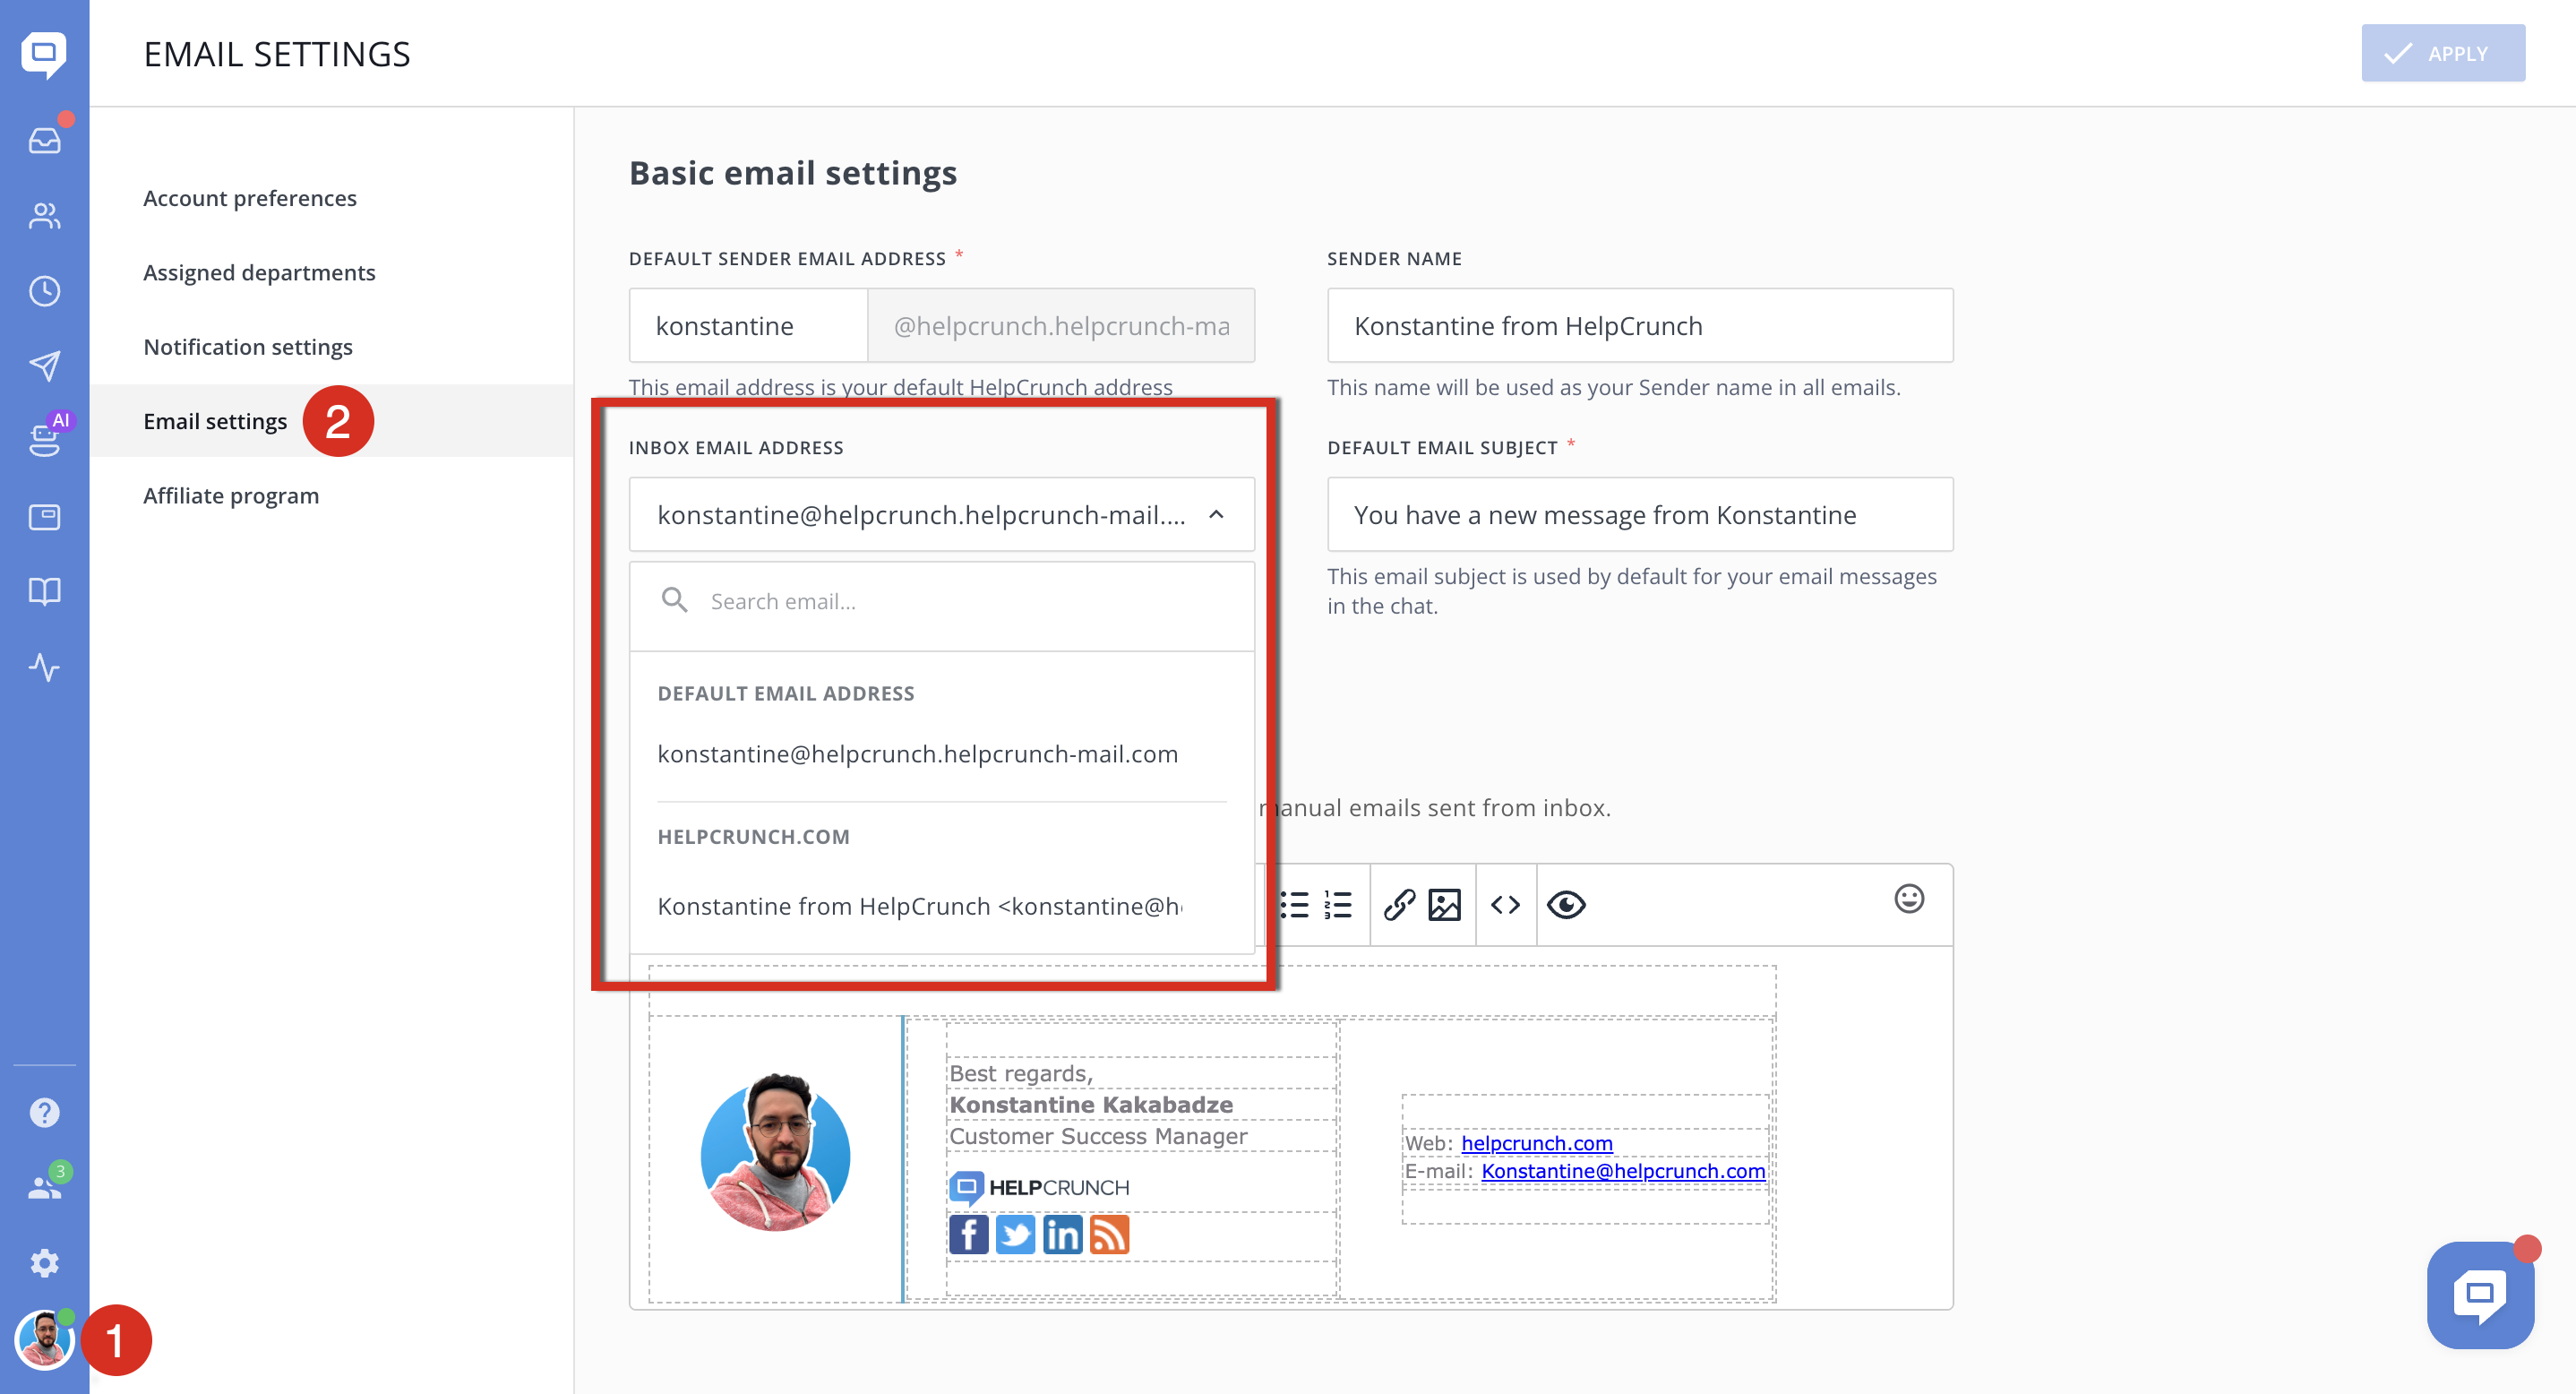
Each team member can set a custom domain as their default outbound email address in "My Account" settings:
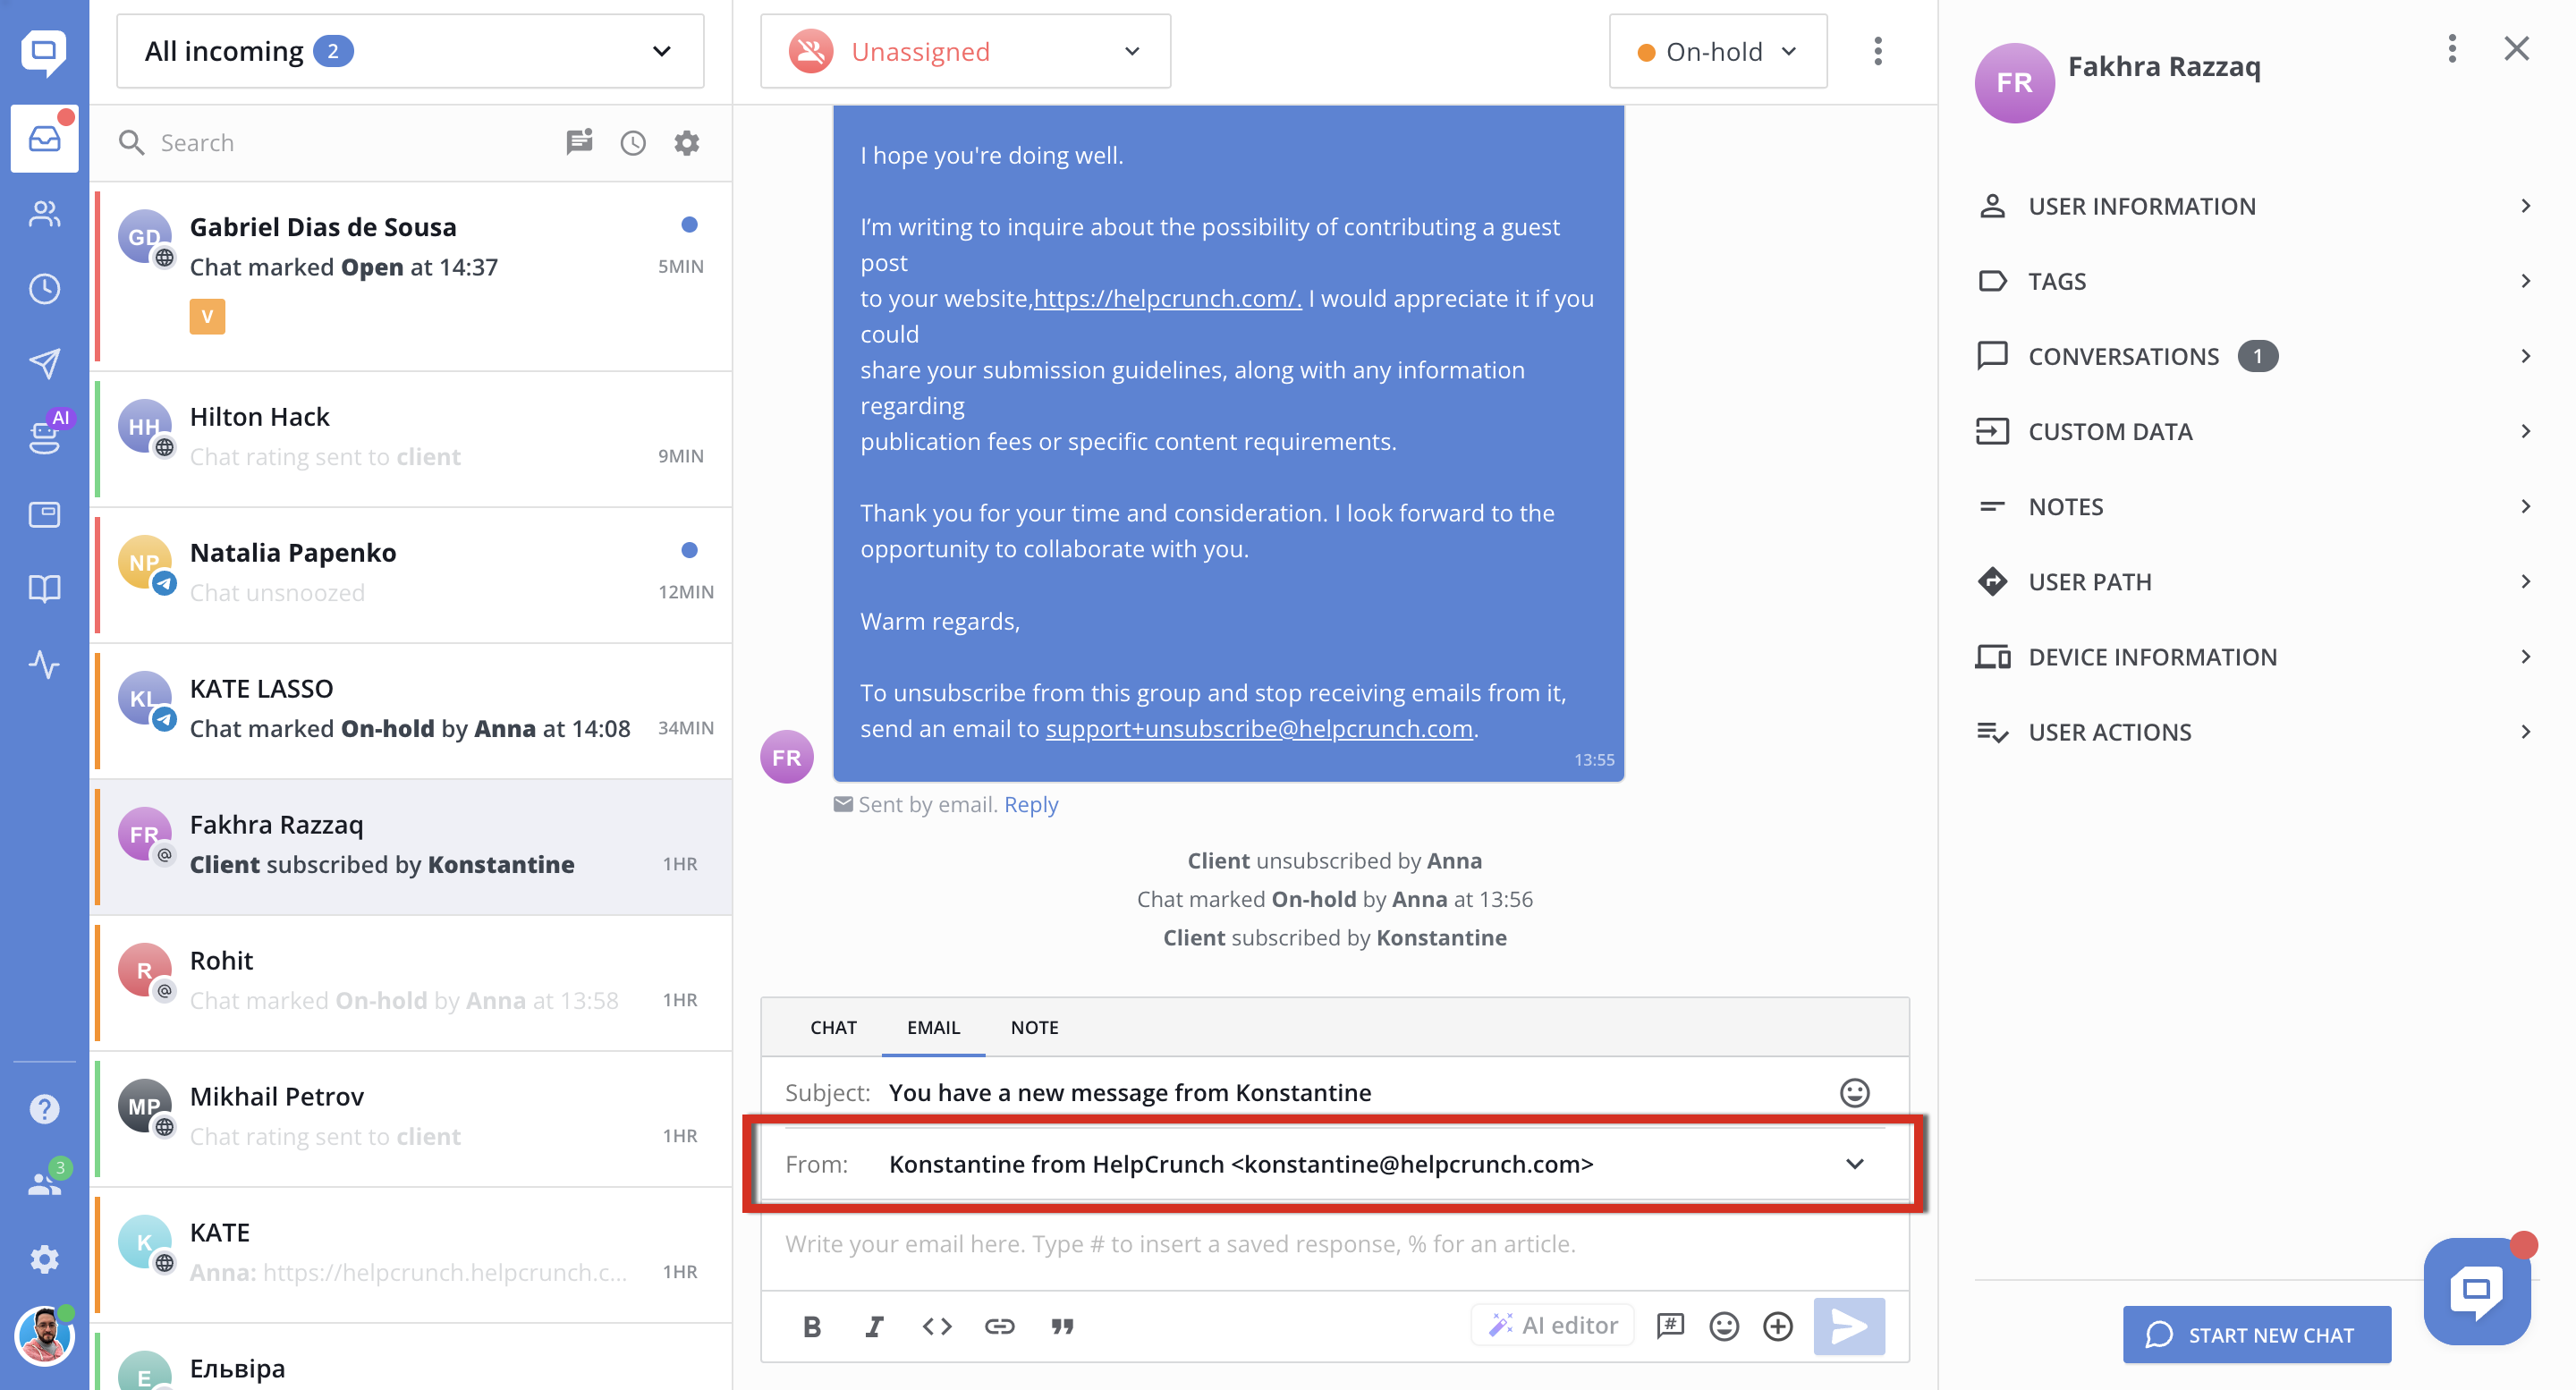
Or manually select required address in chat, before sending an email:
For detailed instructions, see Custom email domains.
Step 6. Analyze email ticketing performance
Because each forwarded email address is mapped to a department, you can use the Departments report to analyze the performance of your email management workflow.
Open Reports → Departments, select a reporting period, and choose the Support or Sales department.
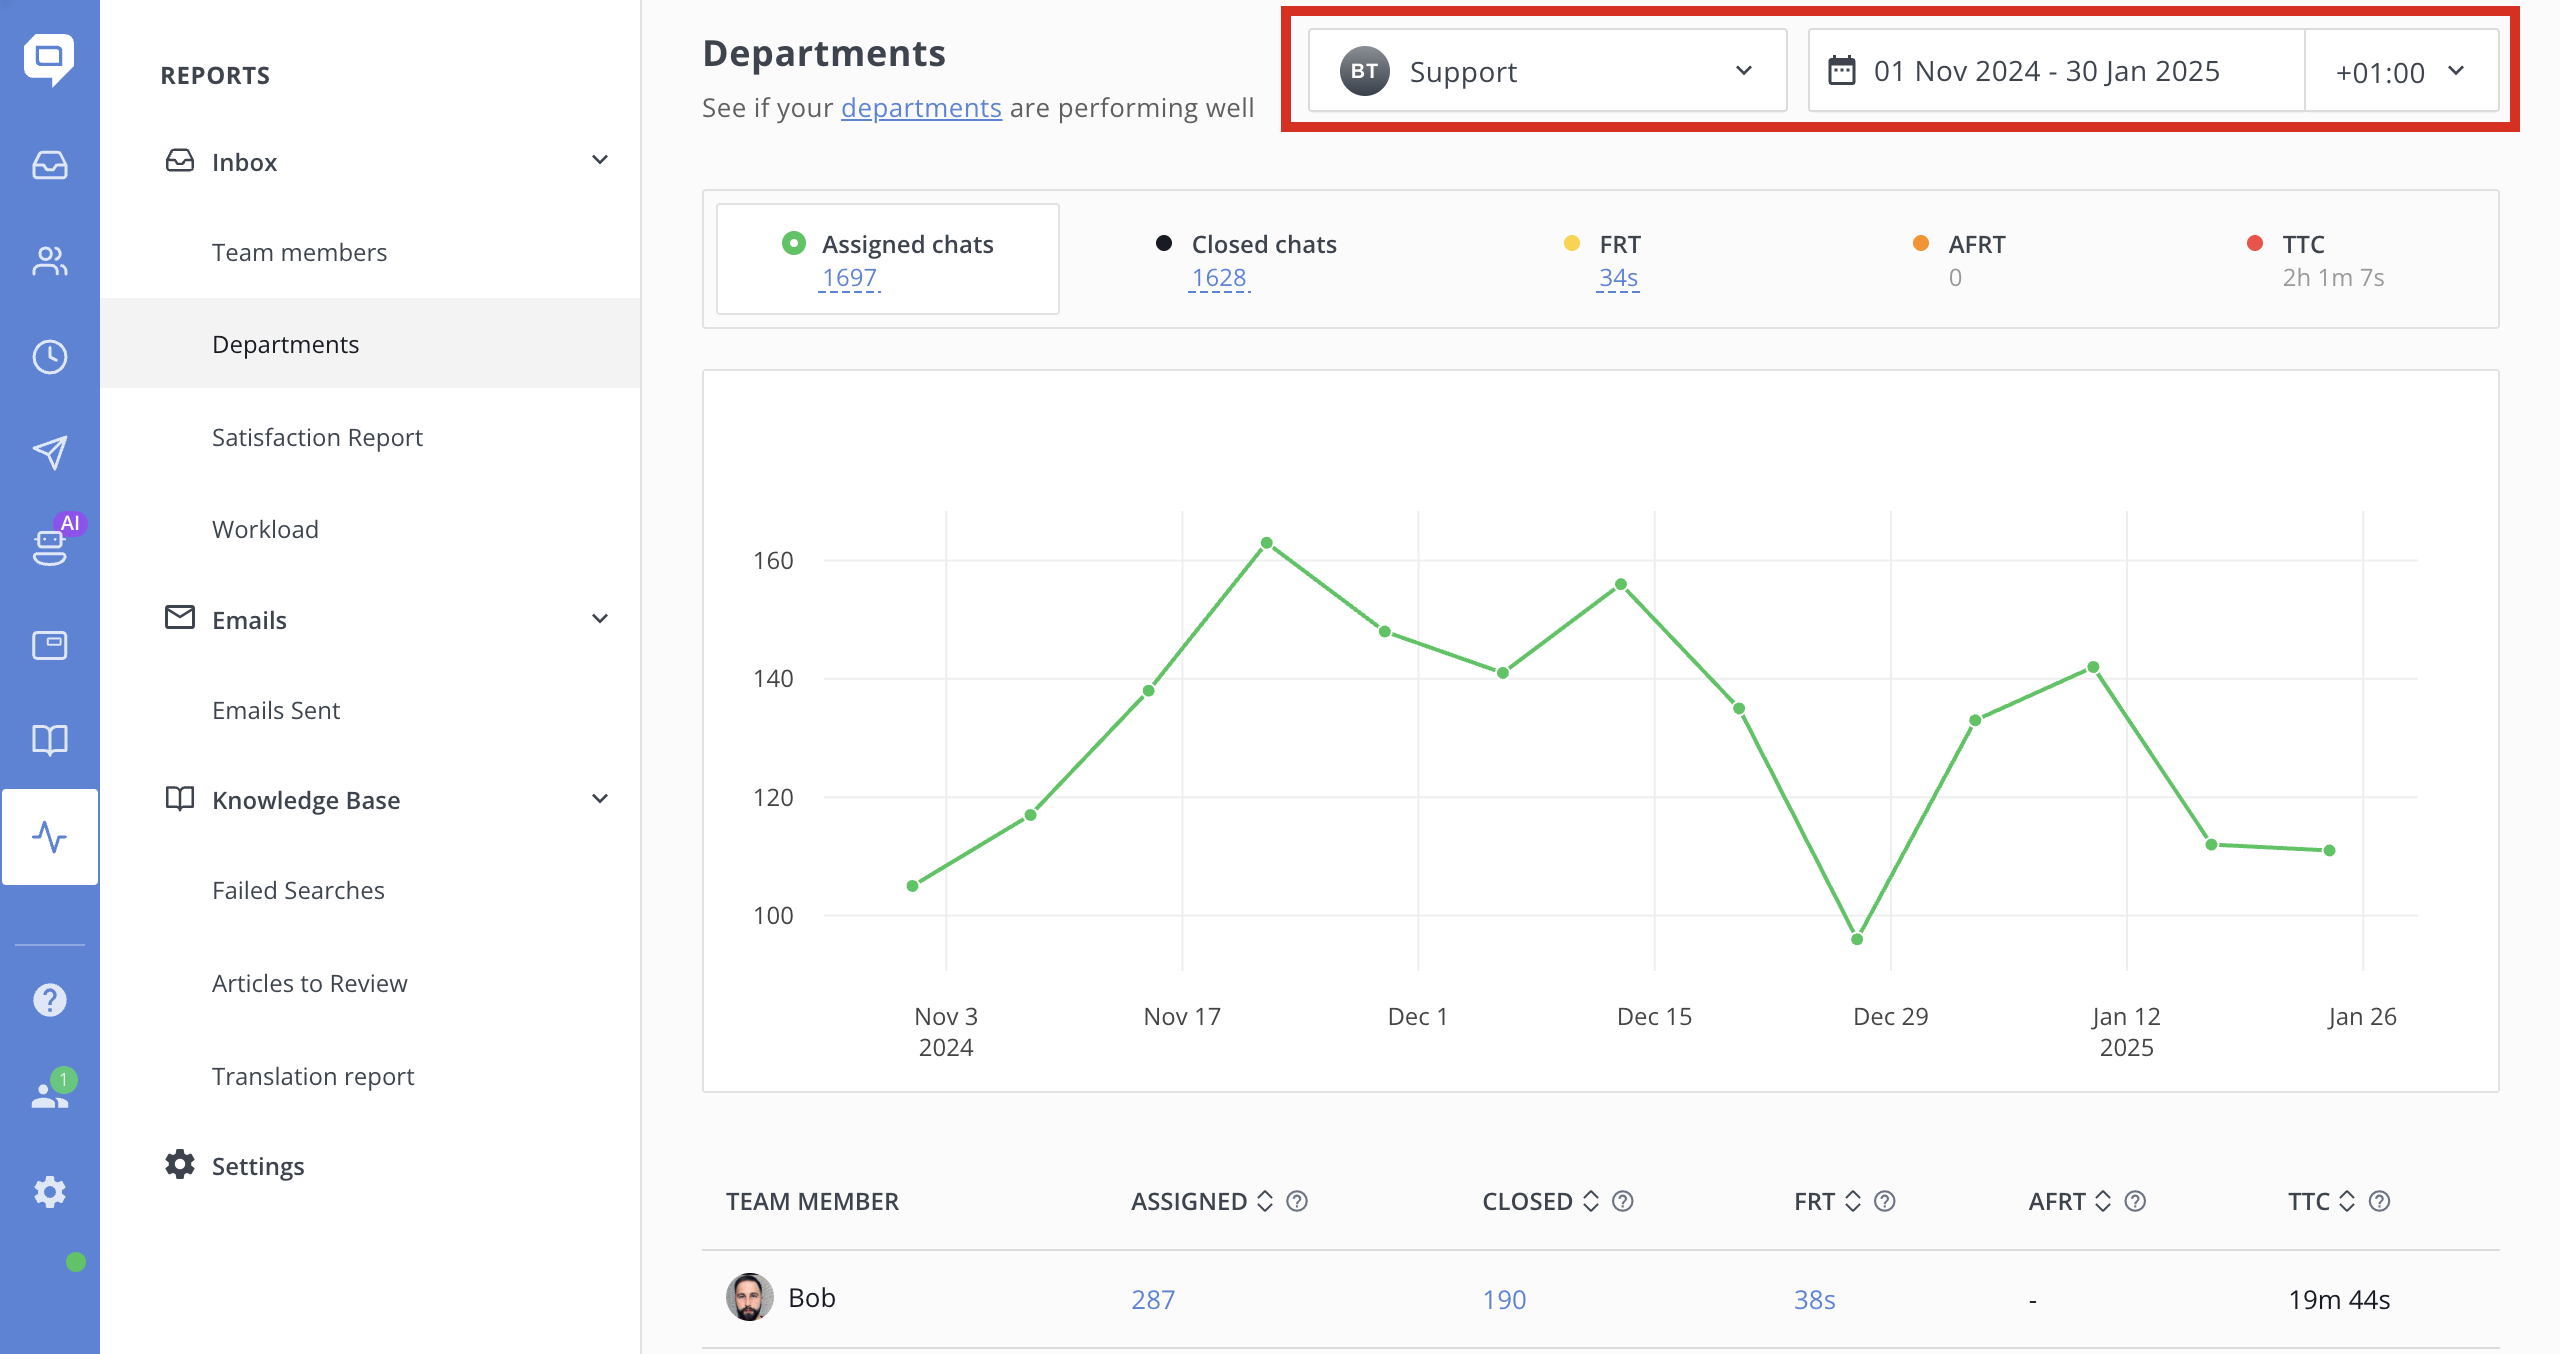
The report includes such helpdesk metrics as:
-
Assigned chats
-
Closed chats
-
First Response Time (FRT)
-
Assigned First Response Time (AFRT)
-
Time to Close (TTC)
This allows you to compare ticket volumes, response times, and resolution efficiency for different departments and forwarded email addresses.
For example, if all messages sent to [email protected] are assigned to the Support department, the Support department report can be used as analytics for that email address.
The report is based on department assignment. If a ticket is assigned directly to an individual agent without a department, it will not be included in the Departments report. If you want analytics to correspond precisely to each forwarded address, maintain a consistent one-to-one mapping between the Email to condition and its department.
Read Departments report for a detailed description of the available metrics.
Managing incoming email tickets
Just like in Groove, Front, Help Scout, Missive, or Hiver, HelpCrunch lets you turn a shared team inbox into a ticketing workflow.
When a forwarded email appears in HelpCrunch, open the conversation and click Reply below the incoming email. This switches the response to the email channel.
From the same conversation, agents can:
-
Reply to the customer by email
-
Review previous chat and email messages
-
Change the ticket status
-
Add tags
-
Leave internal notes
-
Assign the ticket to an agent or department
-
Move the conversation between helpdesk workflows
-
Close the conversation when the request is resolved
The customer receives a regular email, while the support team manages the complete conversation inside the HelpCrunch shared inbox.
Conclusion
After completing the setup, your HelpCrunch email ticketing workflow will work as follows:
-
Customers email your support, sales, or other company addresses.
-
The messages are forwarded to HelpCrunch and created as conversations.
-
Assignment rules analyze the Email from, Email to, and Email subject fields.
-
Each conversation is assigned to the appropriate department.
-
The ticket appears in the corresponding custom helpdesk inbox.
-
Agents reply using the correct custom outbound email address.
-
Department reports provide analytics for the routed email conversations.
This approach combines live chat, email ticketing, email management, routing, and helpdesk analytics in one workspace – without separating customer conversations into different systems.
