What Are Proactive Chat Auto Messages and What Are They Useful For?
Proactive chat auto messages (often called "Triggers") are automatically launched chat messages that appear to website visitors based on predefined rules or user behavior. These messages are designed to engage visitors in real-time, offering assistance or guidance before they even ask for it.
Unlike reactive chat, where a visitor must initiate the conversation, proactive chat allows you to start a conversation and provide relevant information at the right moment. They help capture leads, provide instant support, and guide visitors through key actions, such as signing up or completing purchases.
Benefits and Use Cases of Proactive Chat Auto Messages:
-
Lead Capture: Displaying proactive messages to visitors who have been on your site for a certain amount of time can help you capture potential leads, especially those who are likely interested but need a little nudge. For example, offering help with product questions or showcasing key features.
-
Guided Navigation: Proactive messages are great for directing users who might be stuck or unsure about what to do next. If a user spends too much time on a specific page (e.g., pricing or features), you can offer assistance, prompting them to engage or take the next step.
-
Customer Support: If a visitor appears to be on your support page or has been browsing for a while, a proactive message can invite them to chat, answering questions instantly and reducing the likelihood of them leaving without a resolution.
-
Conversion Boosting: You can trigger a proactive message when a user shows intent to convert (e.g., visiting a pricing page or adding items to a cart). A well-timed offer or incentive can help increase your conversion rates.
-
Product Education: When visitors land on specific pages, proactive messages can guide them through product features or how-tos, making it easier for them to understand the product’s value.
-
Reducing Bounce Rate: If a user is about to leave the page, showing a proactive message with a special offer or reminder can encourage them to stay engaged and complete their purchase or sign-up.
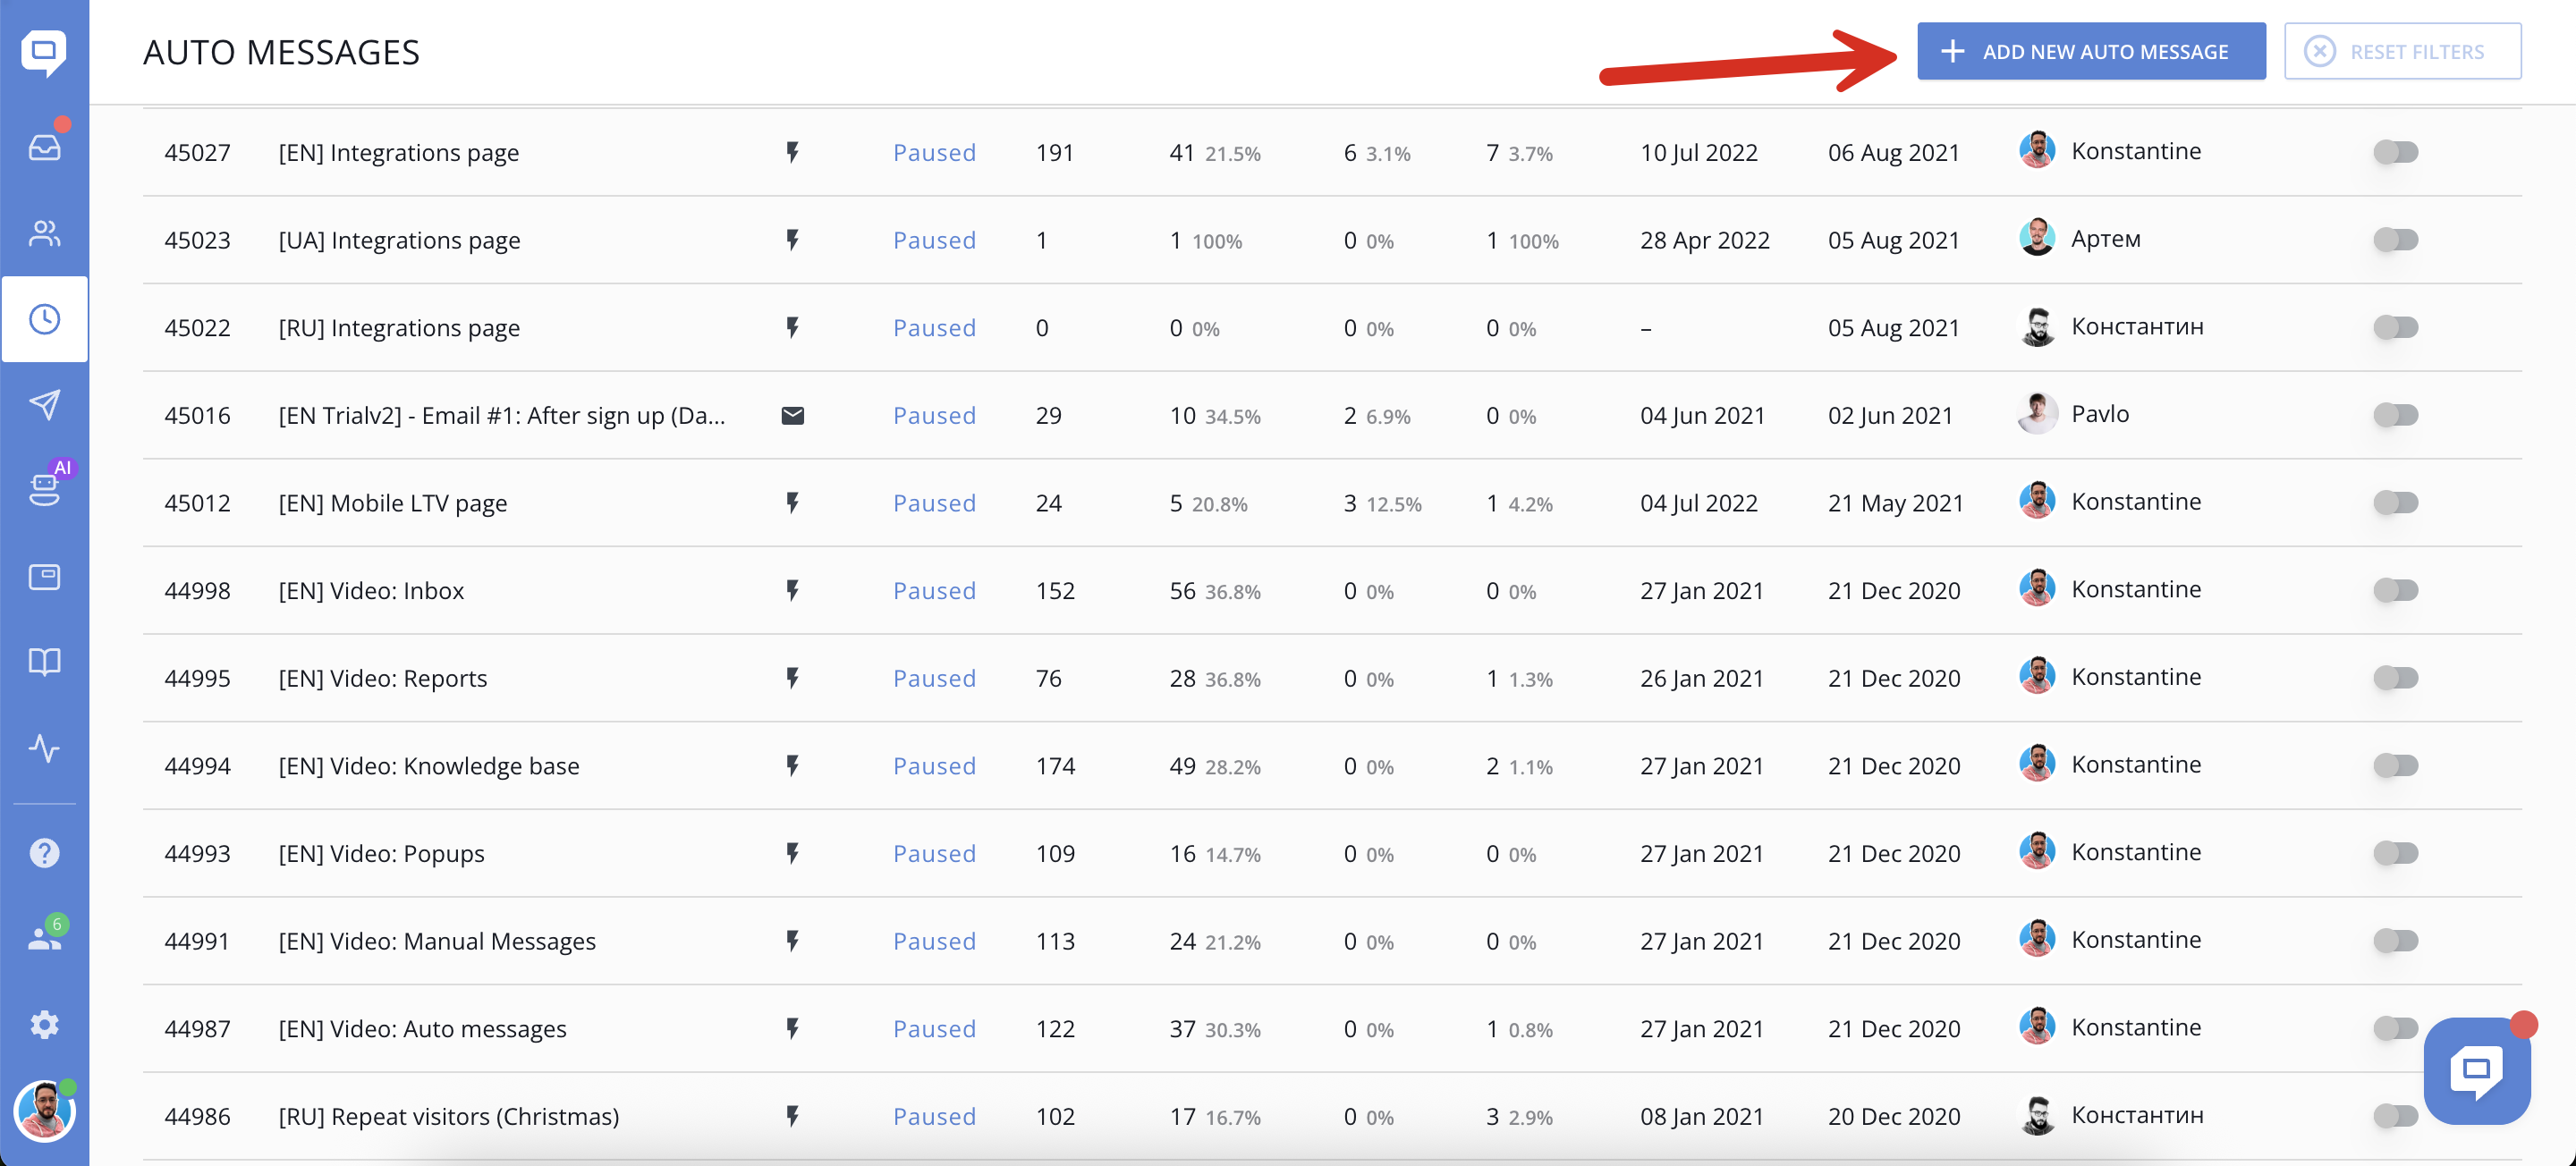
How to Create a Proactive Auto Message?
Step 1: Create a New Auto Message and Select Its Type
Go to the Auto Messages section in the main menu and click Add new auto message.
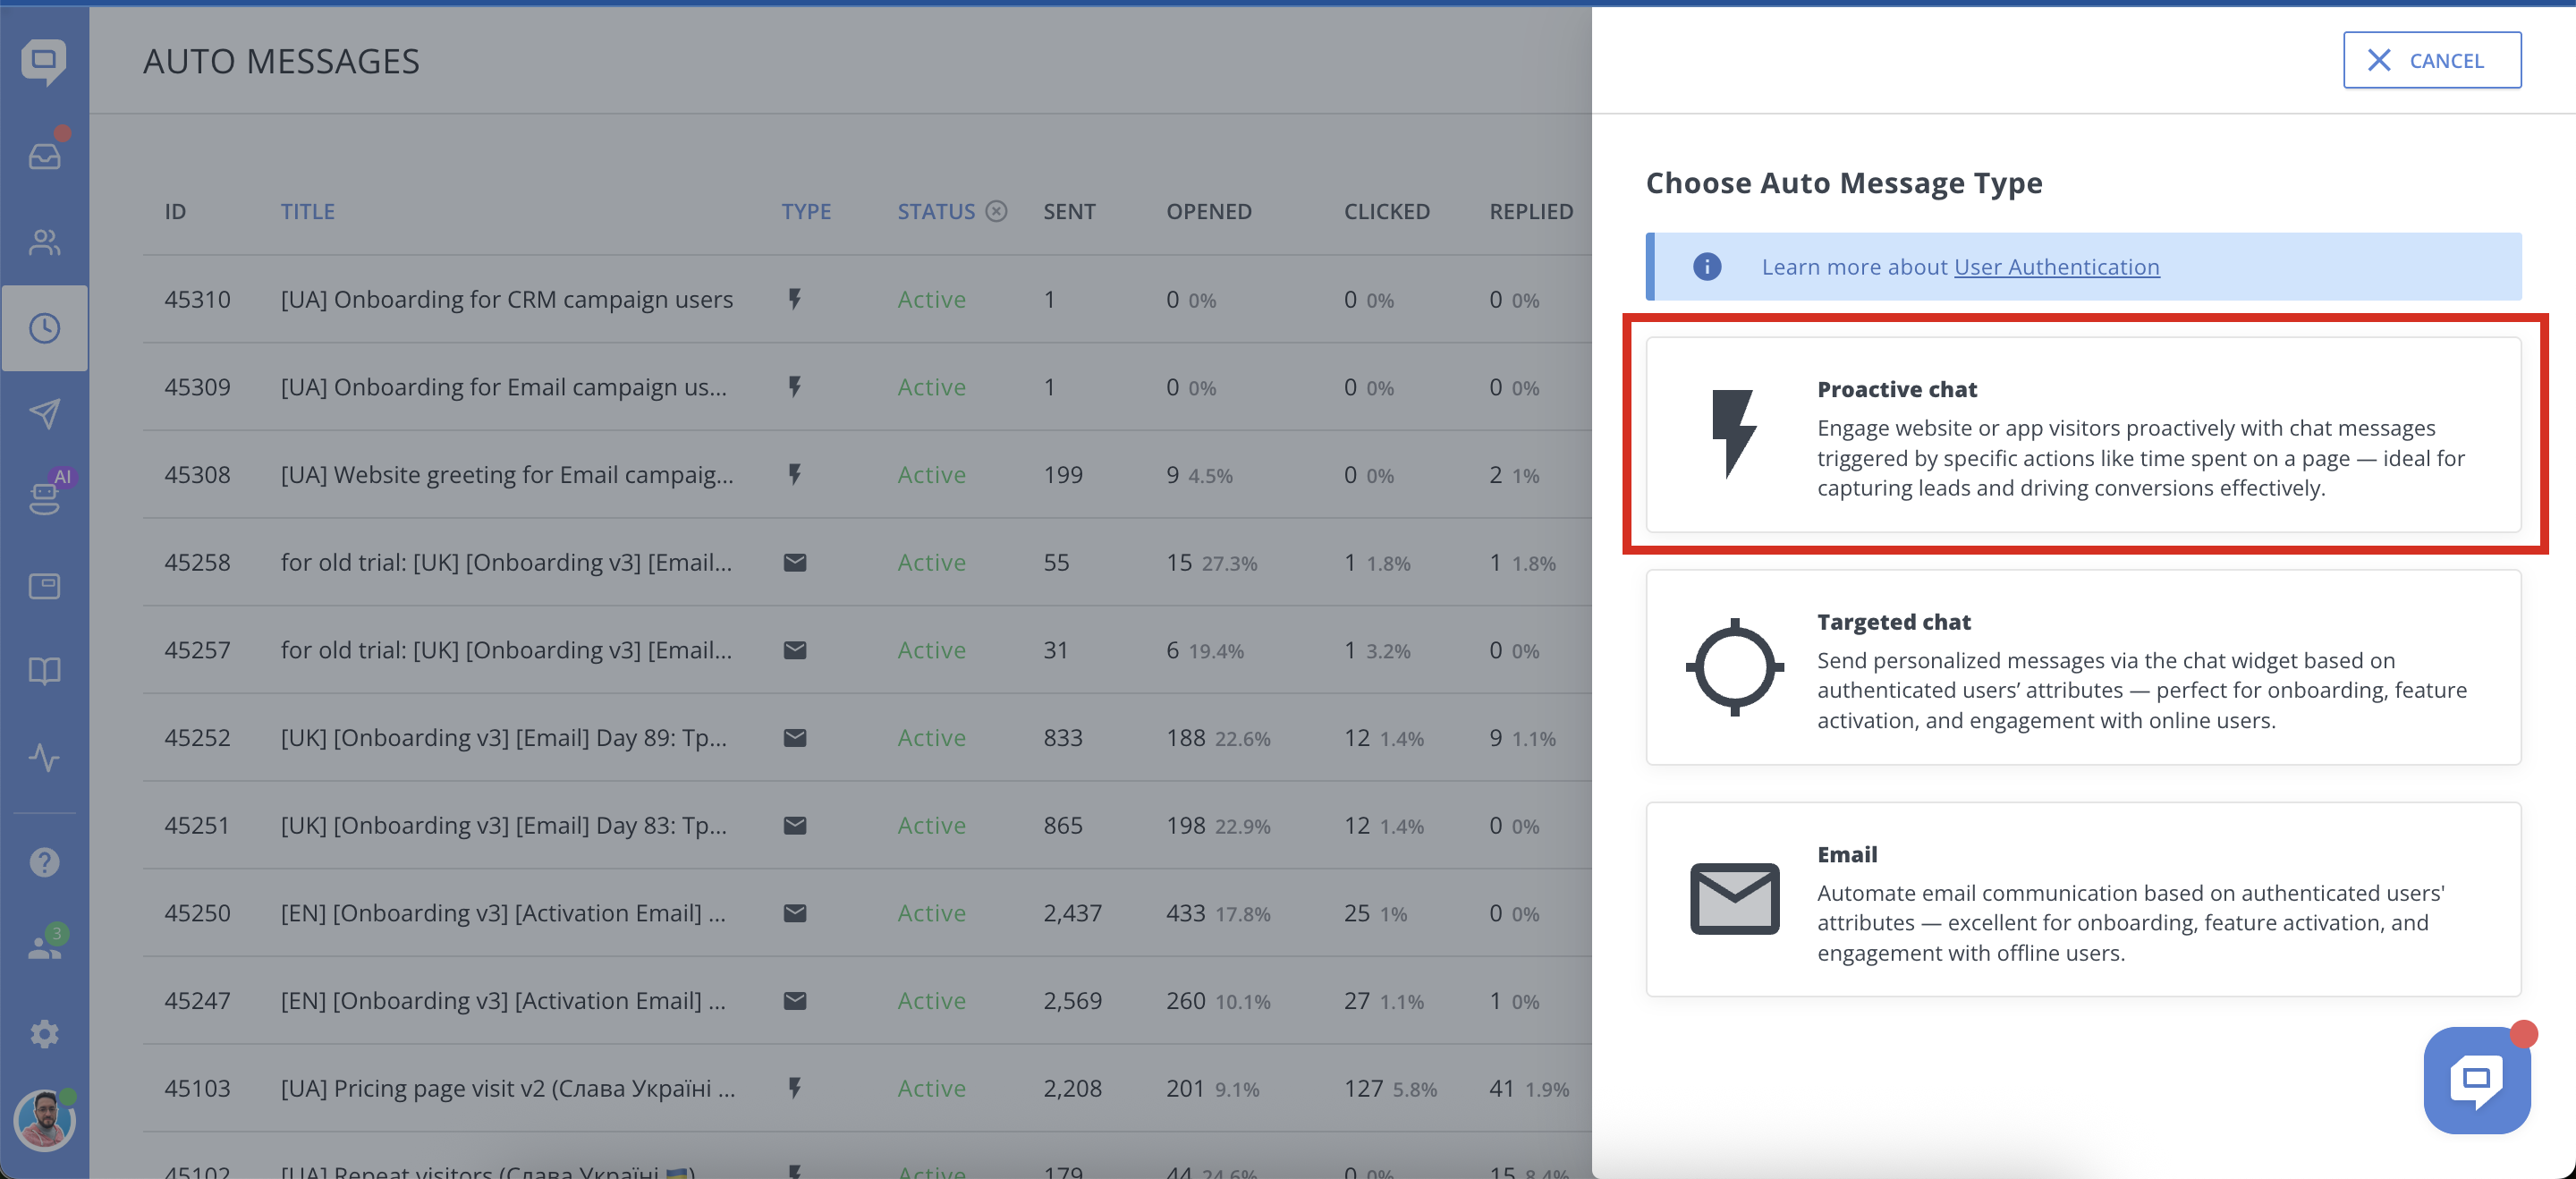
Then select one of three message types:
-
Proactive chat – Triggered by real-time visitor behavior (e.g., time on page, URL match). Great for lead capture and engagement.
-
Targeted chat – Shown in the chat widget and mobile SDK to authenticated users based on their actions. Perfect for onboarding or feature promotion.
-
Email – Delivered via email based on custom attributes or behavior. Ideal for lifecycle campaigns and reactivation.
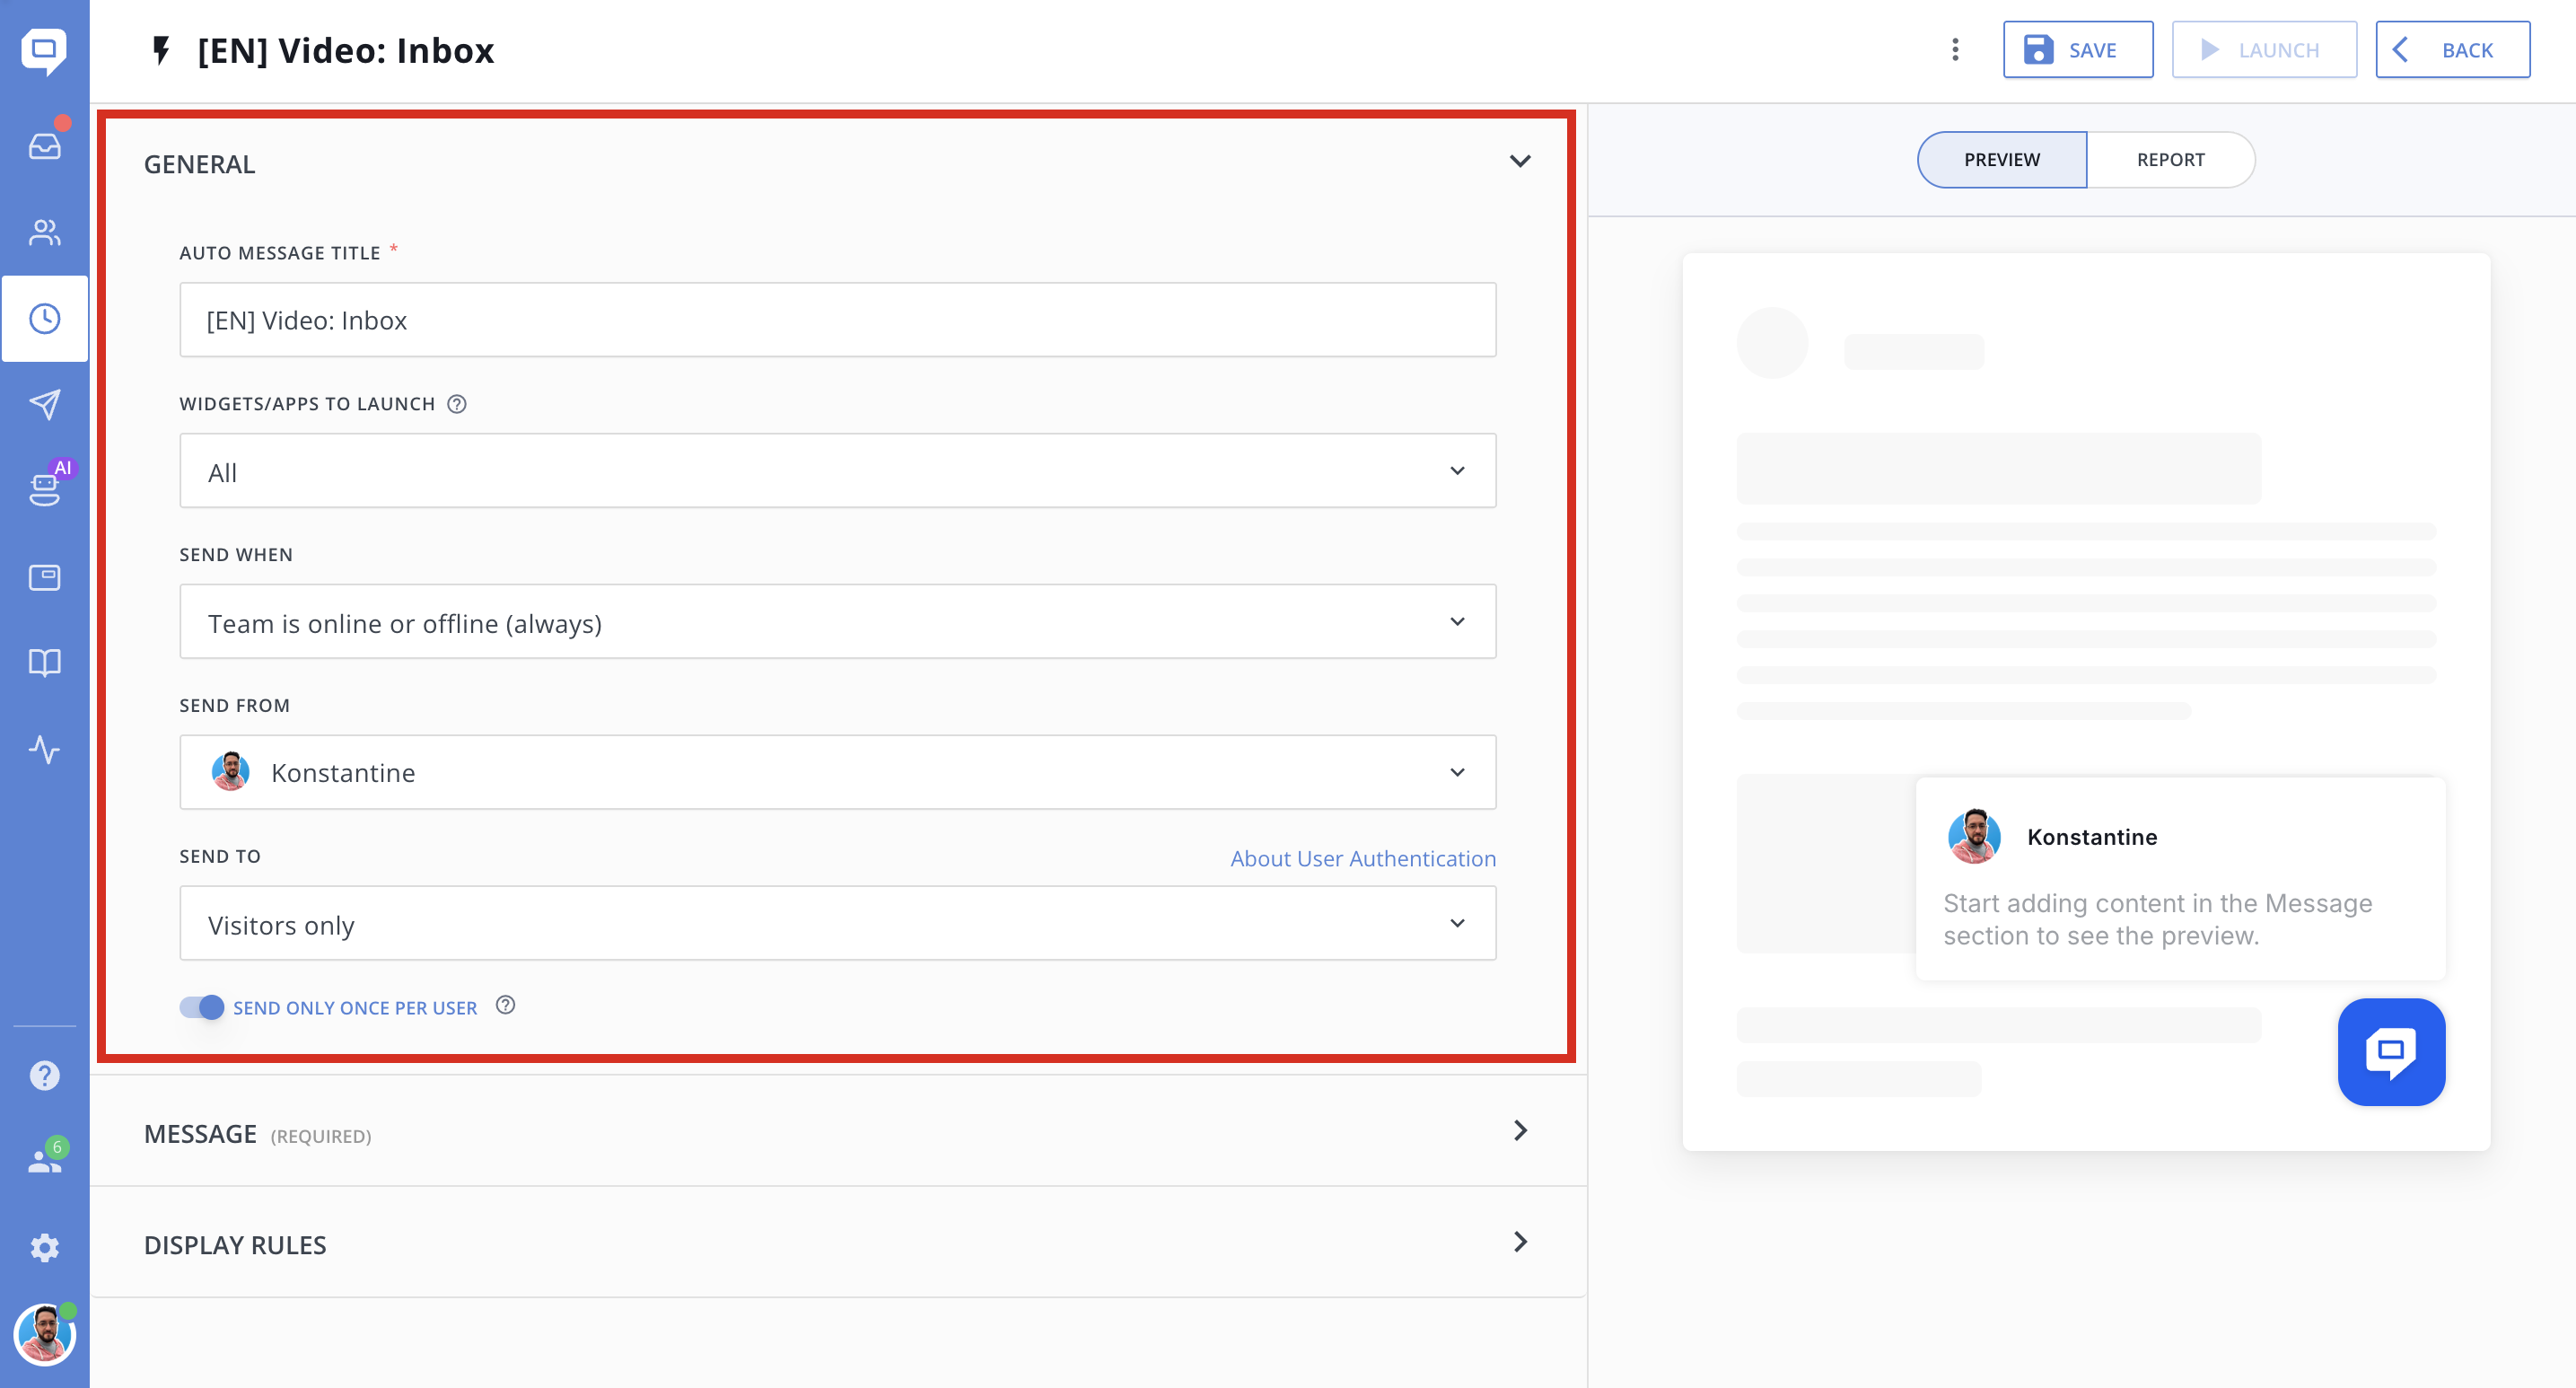
Step 2: Fill Out General Settings
After selecting the Proactive Chat type, fill in the General section:
-
Title – Internal name to identify the campaign (not shown to users)
-
Widget/Apps to launch – Choose which widget this message should be displayed in (chat types only)
-
Send when – Define if the message should appear when your team is online, offline, or in both cases
-
Send from – Pick the sender (chat agent, to make it more personal)
-
Send to – Choose between visitors (anonymous) or authenticated users
-
Send only once per user – Enable this toggle to avoid sending the message more than once per recipient.
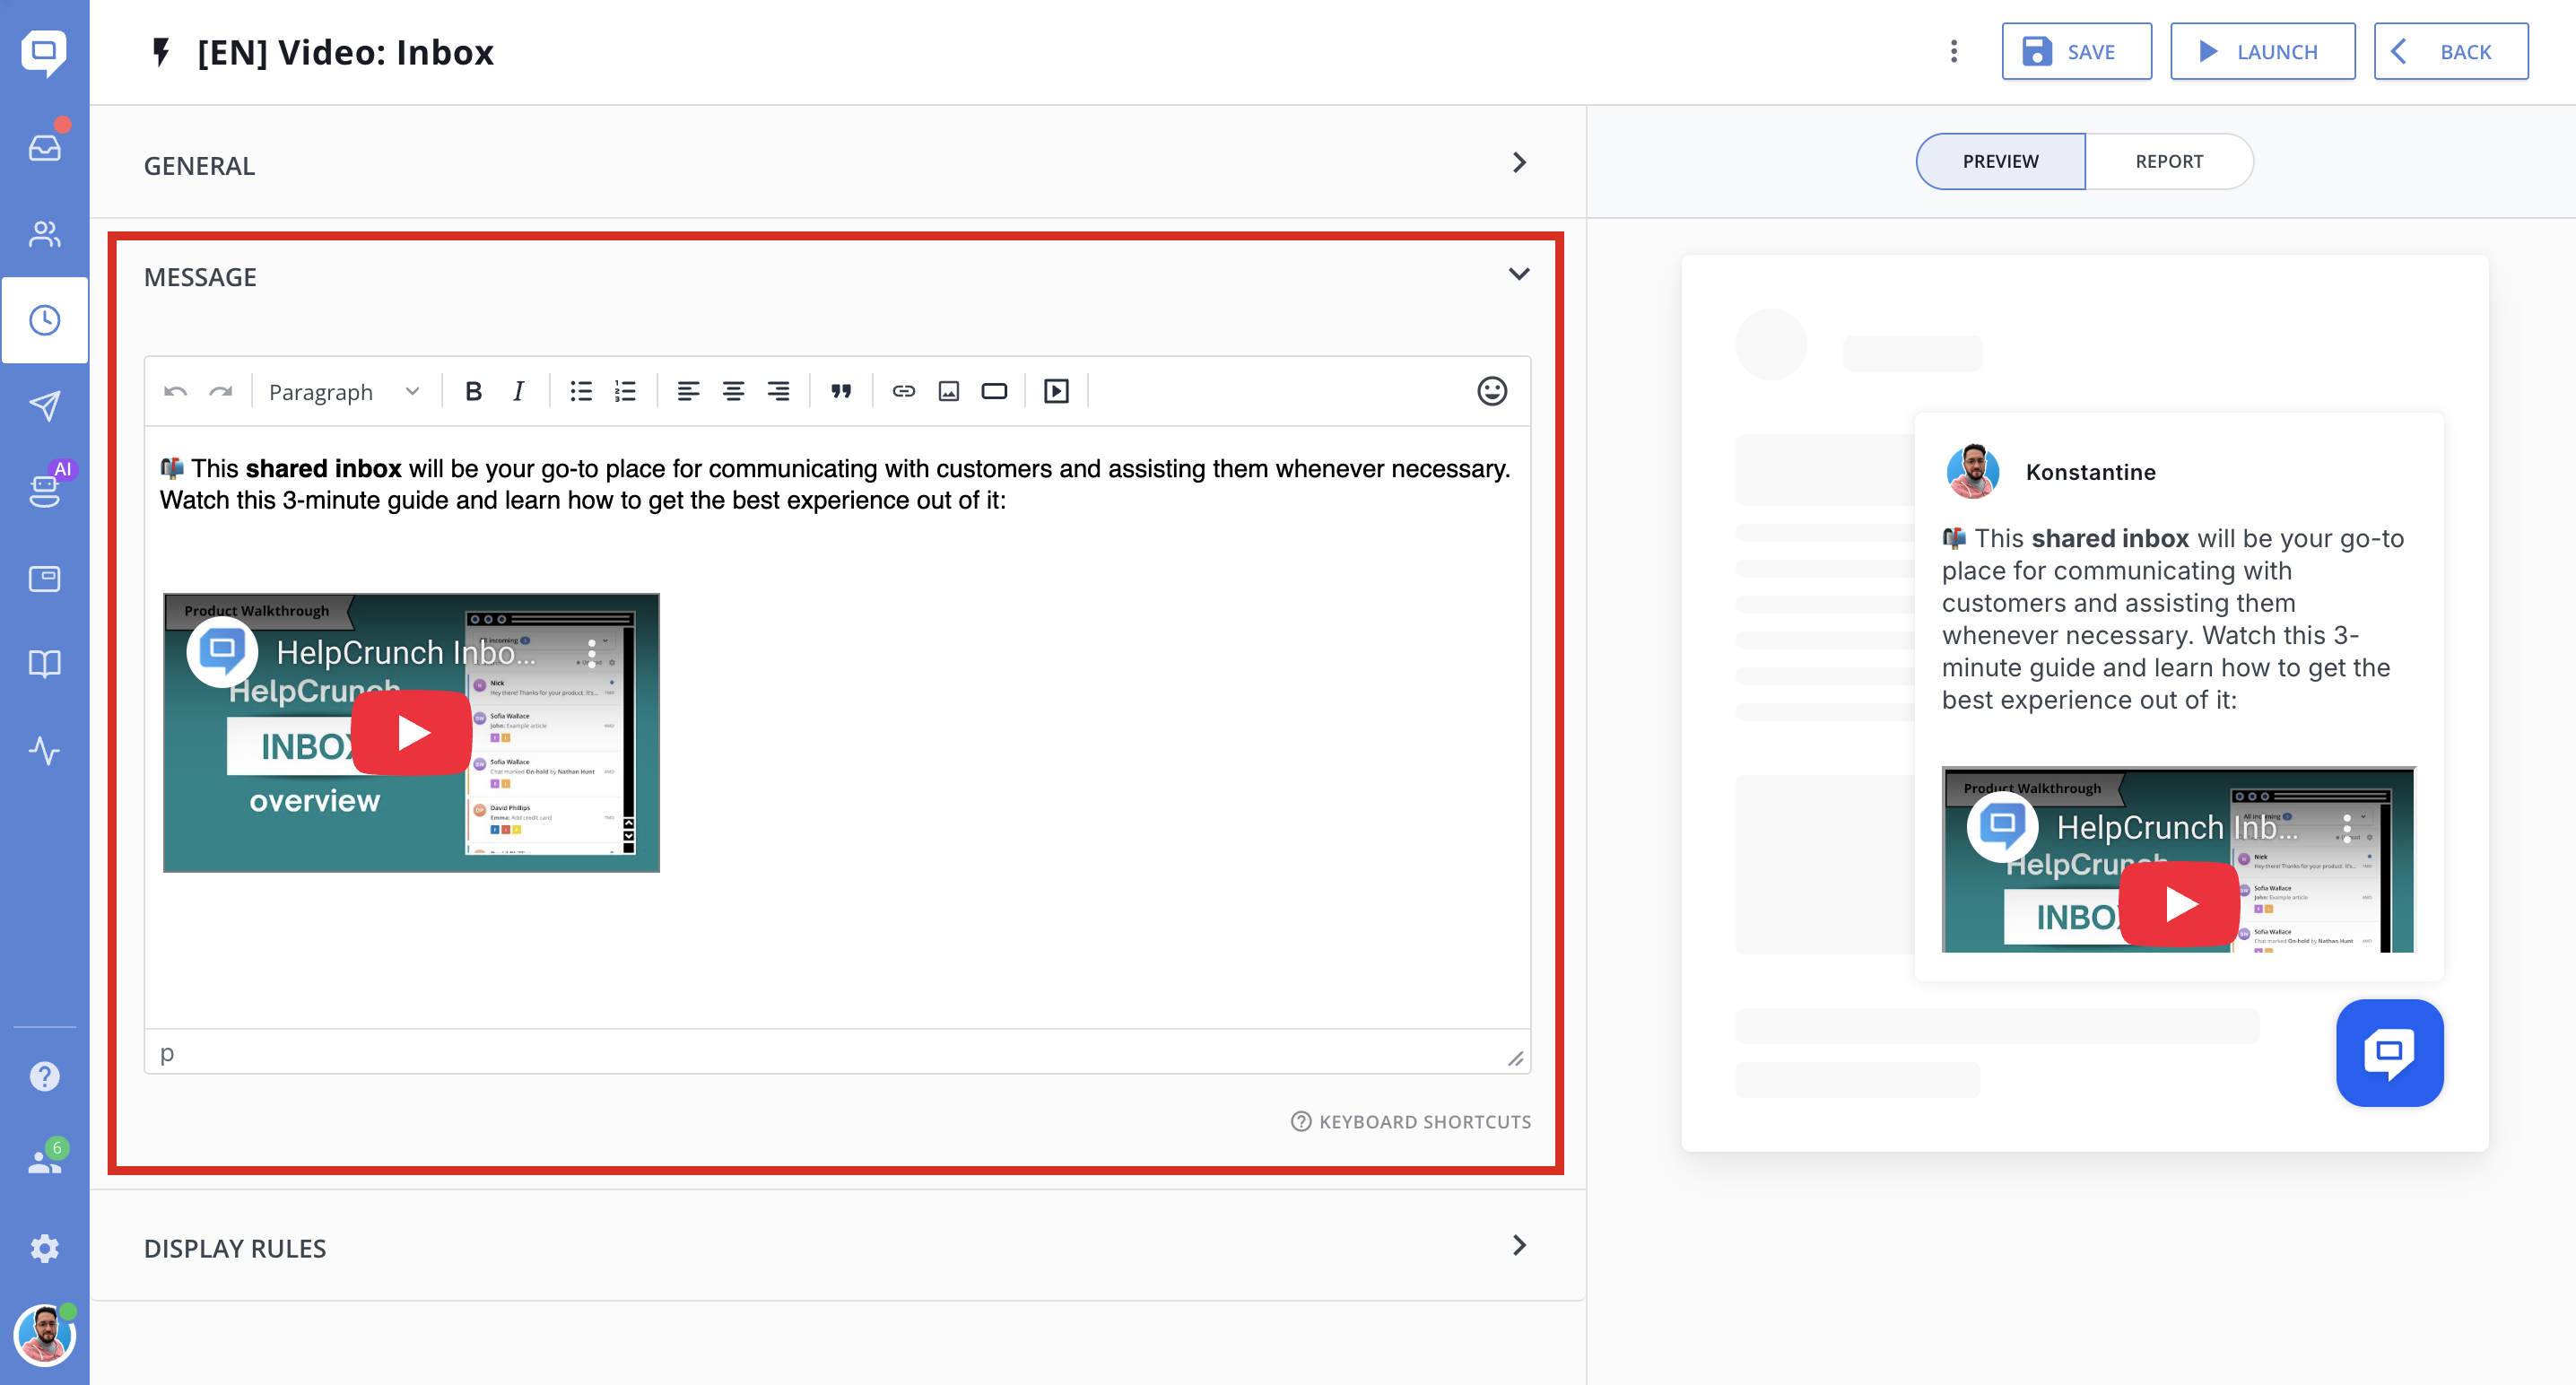
Step 3: Compose the Message
In the Message section, type the content your users will see.
-
Use the rich text editor to write a short, conversational intro. Include formatting, emojis, links, or buttons. At this stage, GIF images are a real attention magnet and we highly recommend using them, but not too much
-
A live preview on the right will update as you type
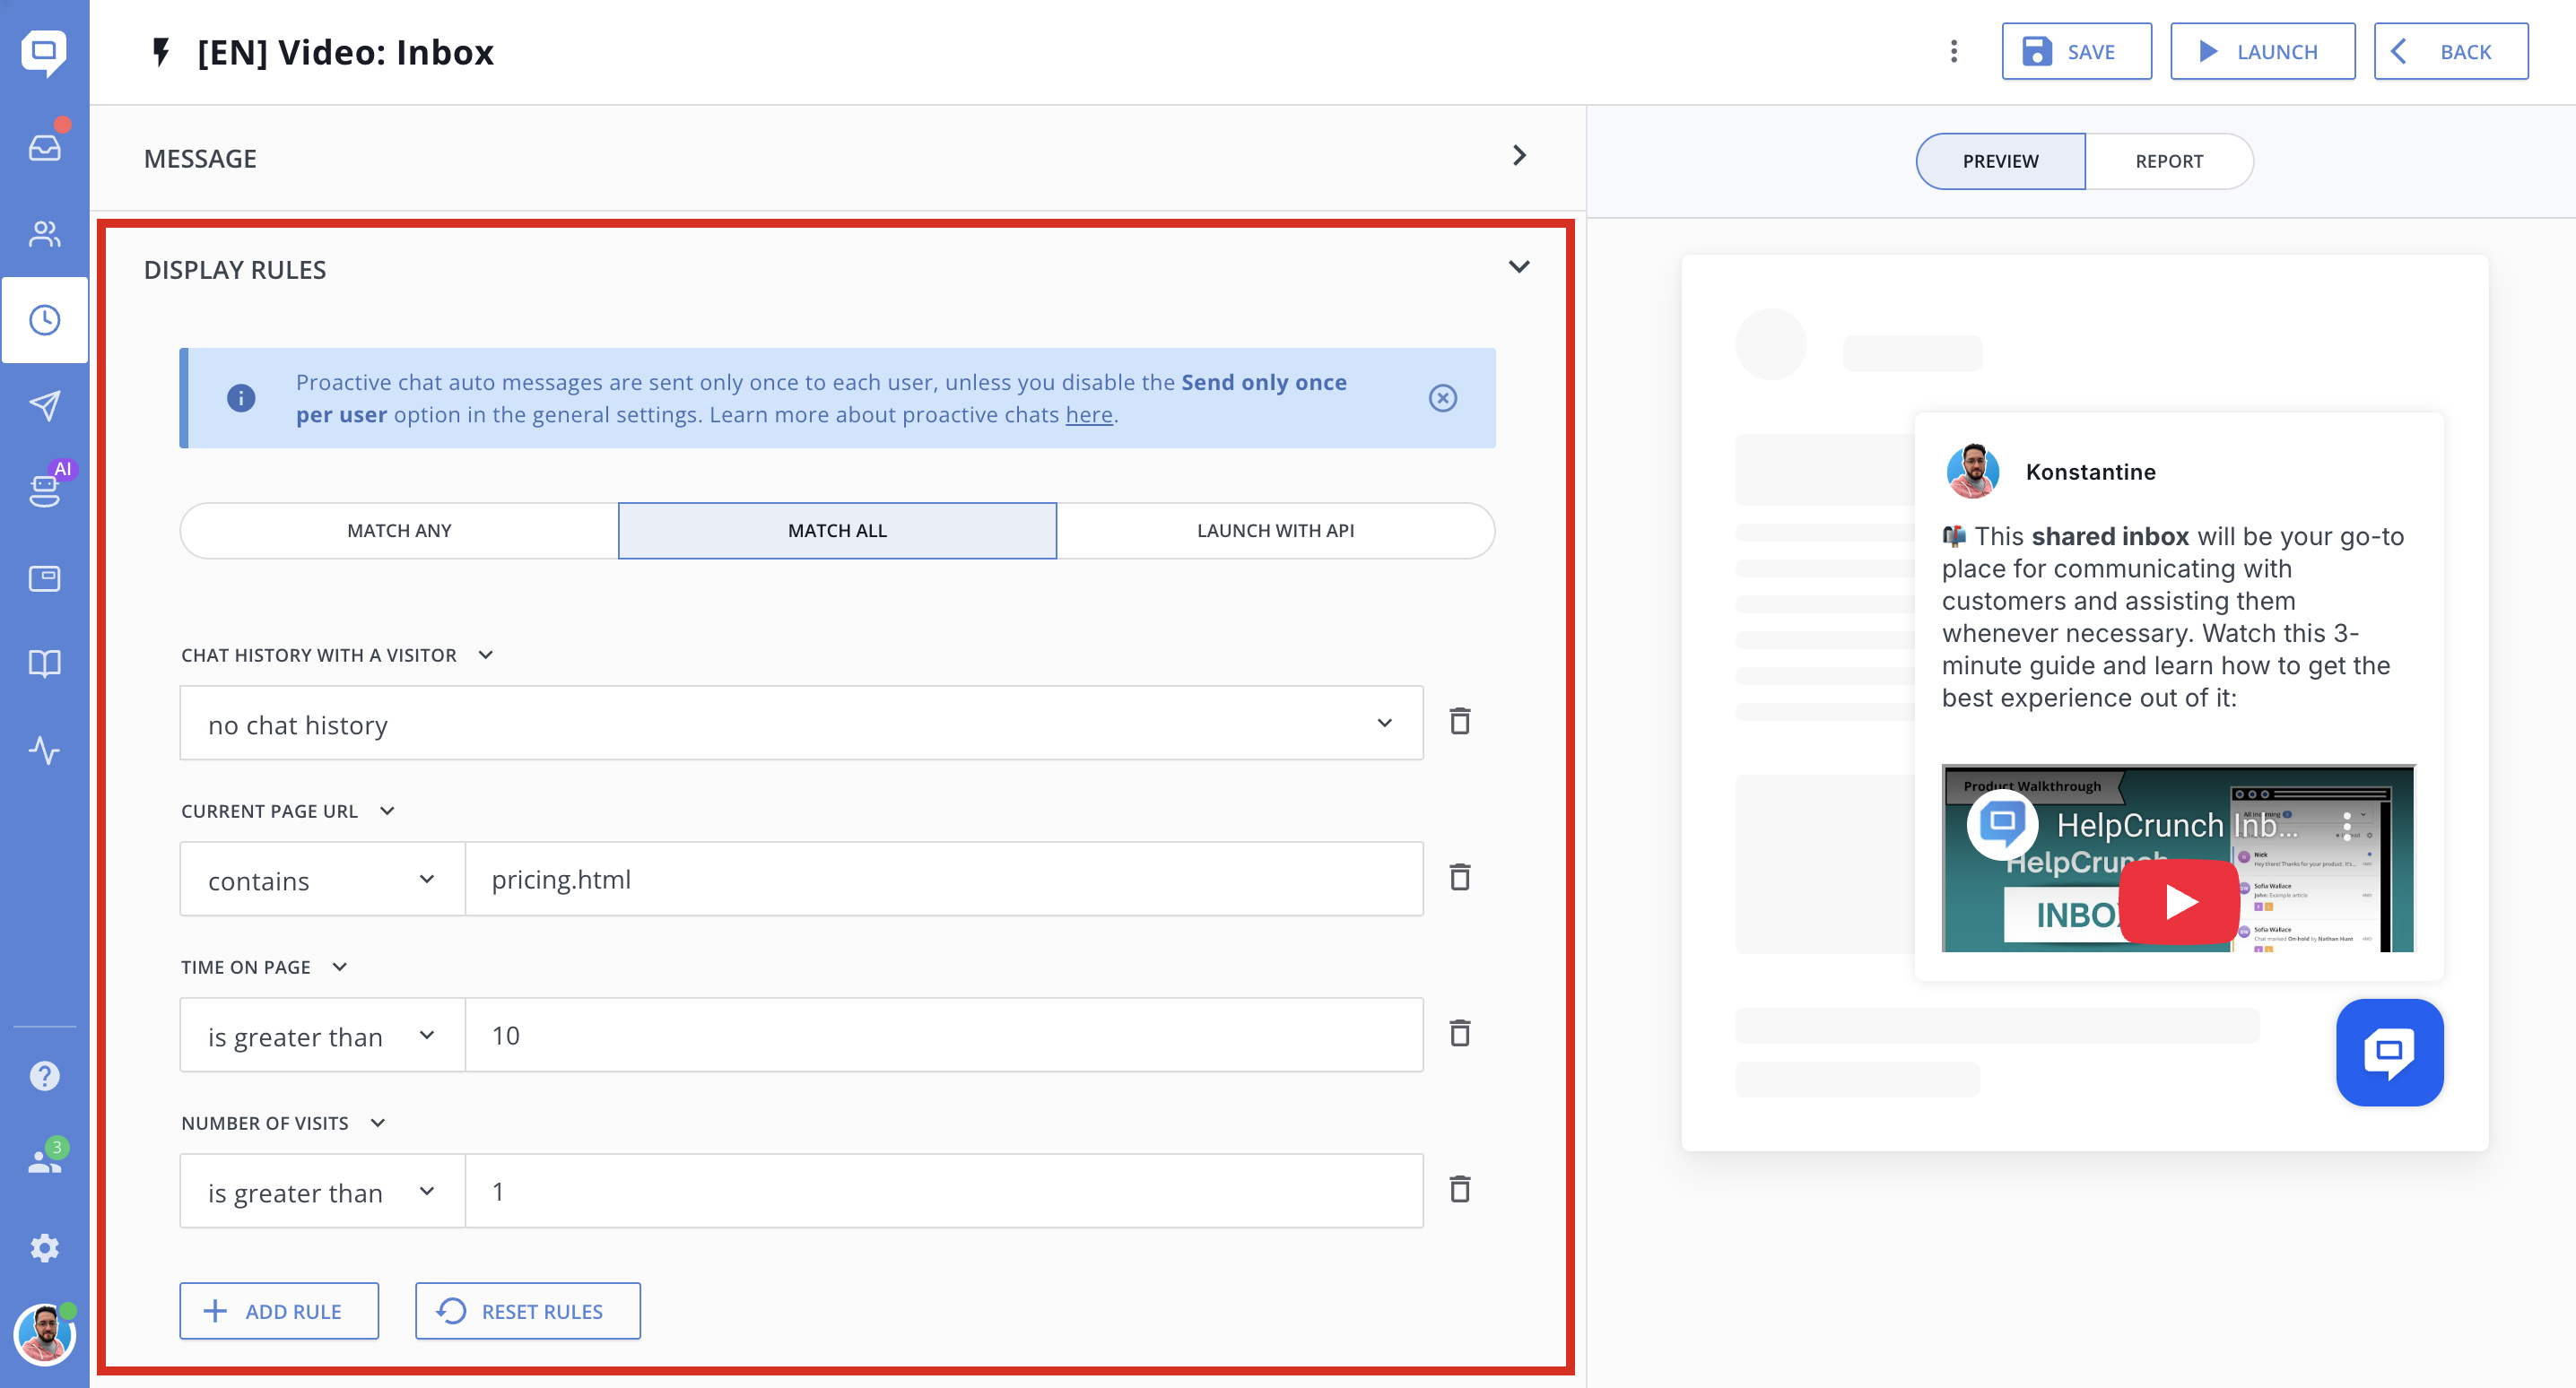
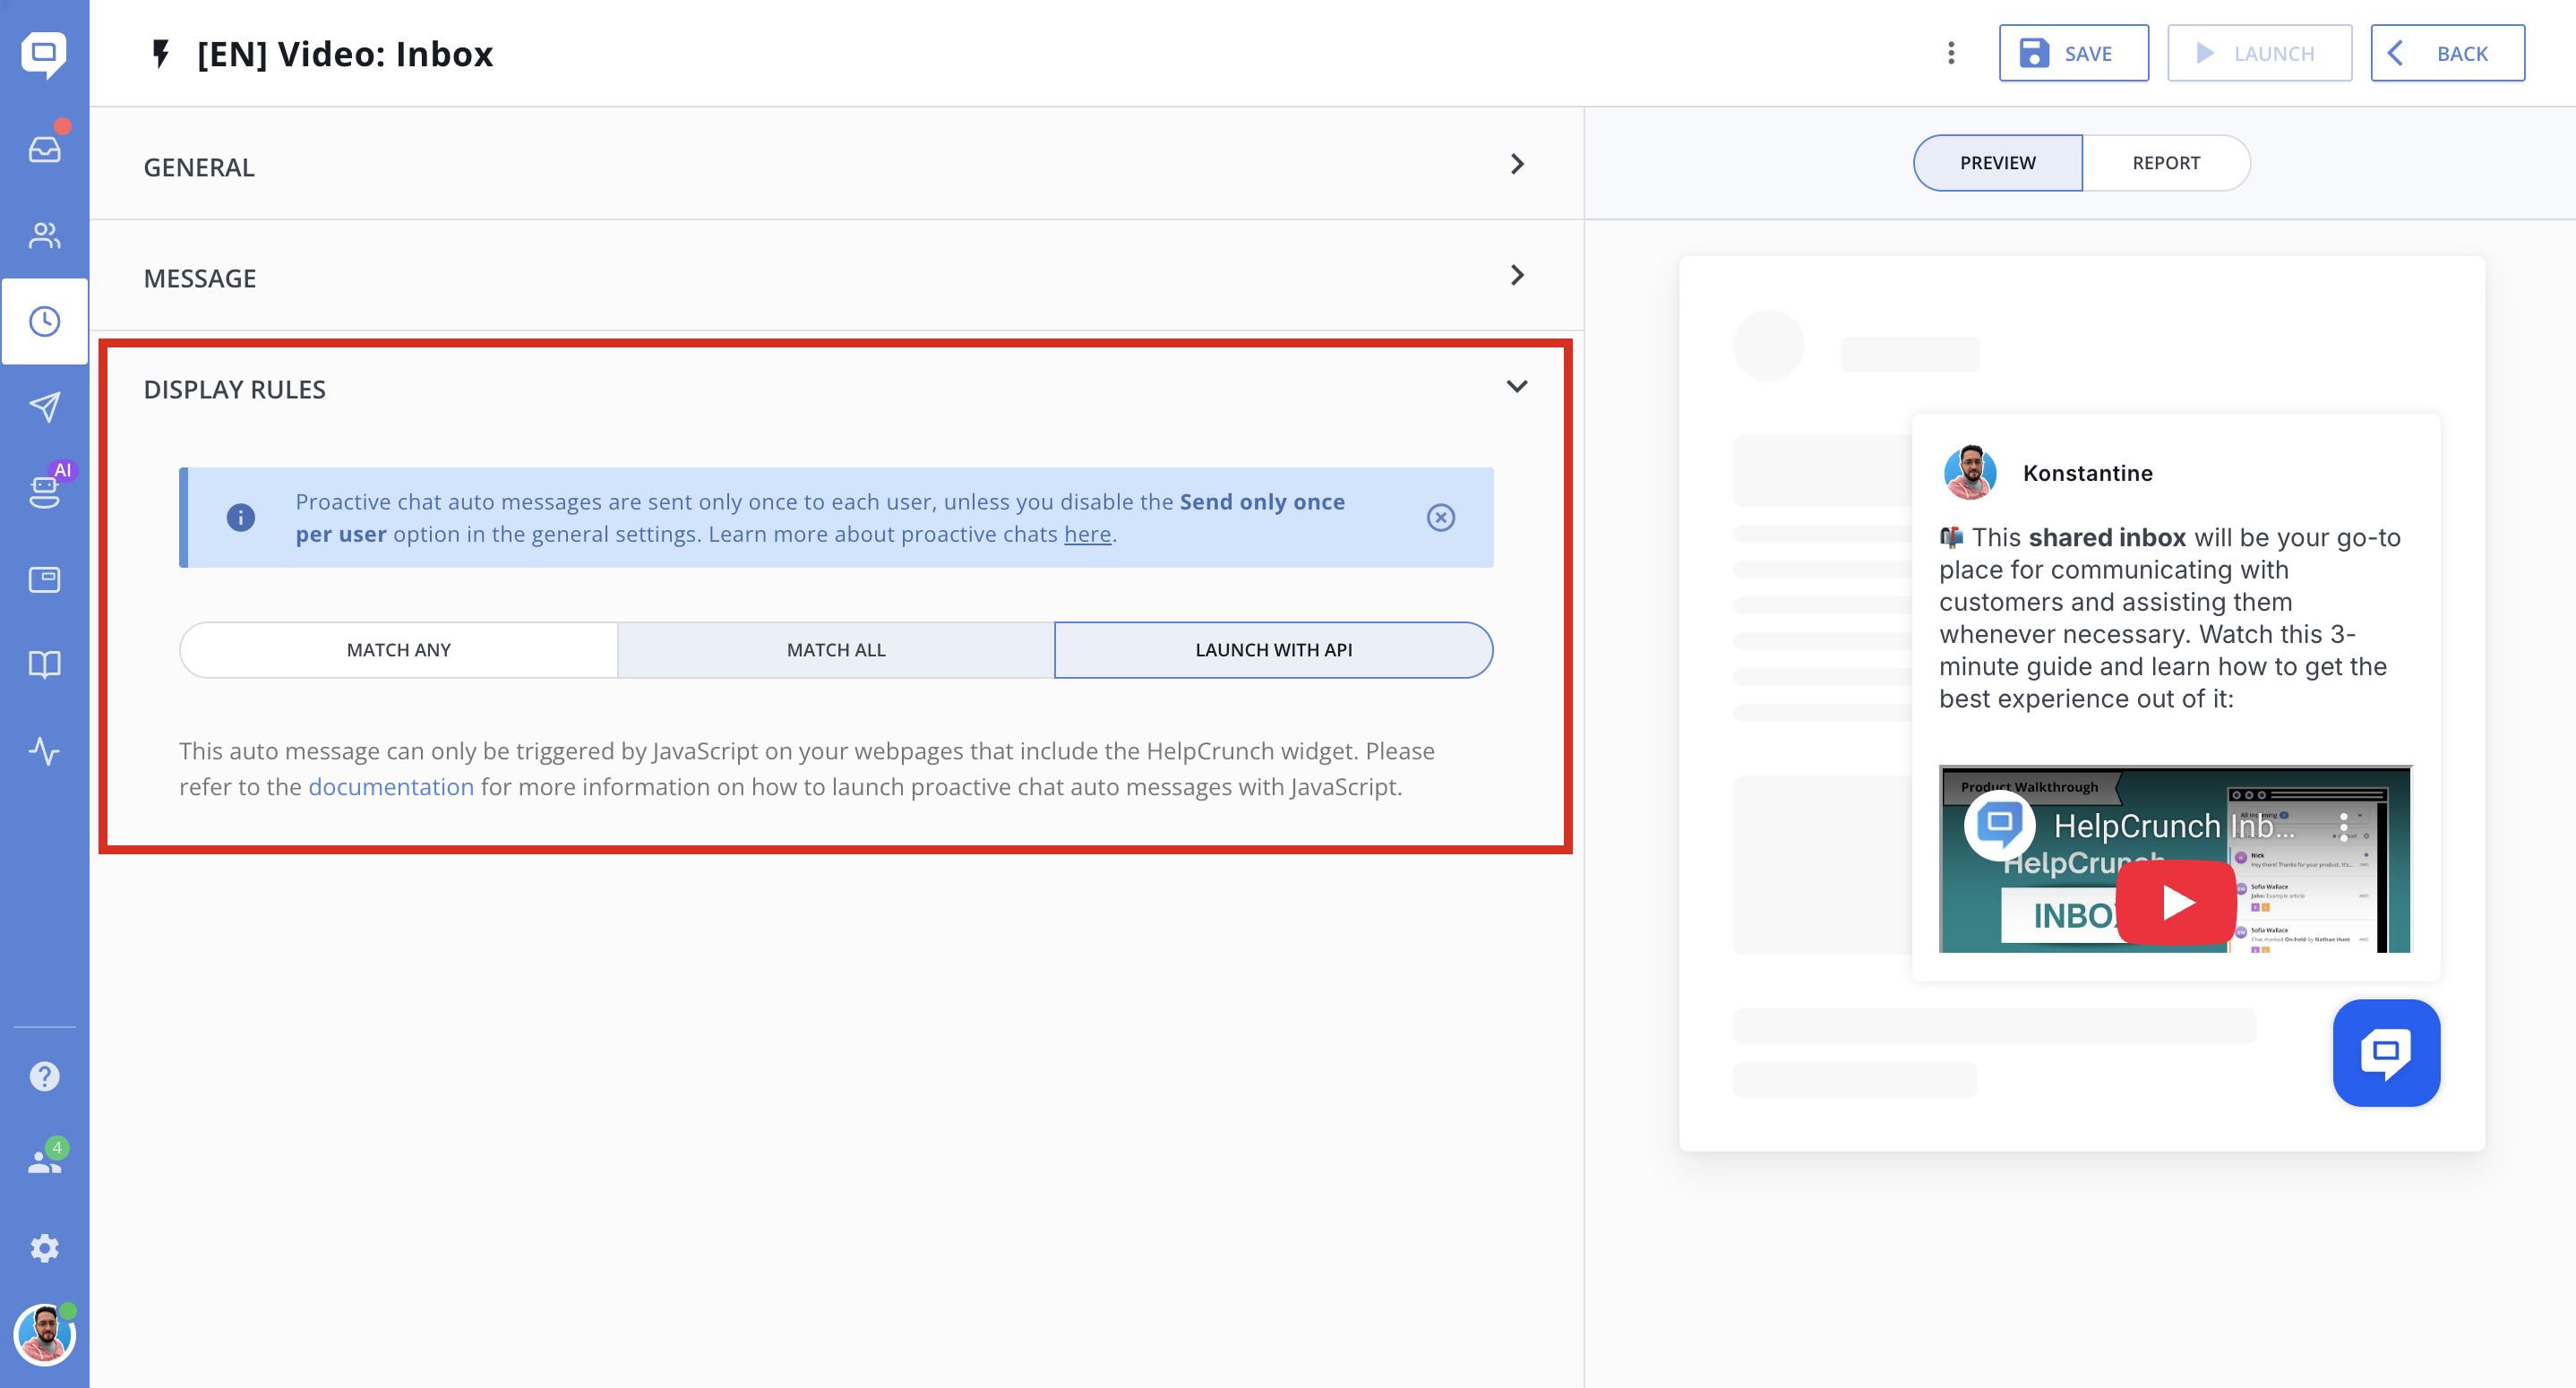
Step 4: Define Display Rules (Proactive Chat Only)
Now, configure rules that determine when the message should appear. For example:
-
Chat history with visitor – No chat history -
Time on page – is greater than - 10(if the visitor spent more than 10 seconds on the page) -
Current page URL – contains - /pricing.html(show it on a specific page) -
Number of visits – Greater - 1(for returning visitors)
This auto message will be displayed to visitors who haven't had previous conversations, who visited your website previously, are currently visiting your pricing page, and who spent more than 10 seconds on that specific page.
Here is the list of the existing rules along with their corresponding values:
| Chat widget is opened | True / False | |
| Browser language | Equals / Is not | English, French, Spanish, etc.. |
| Chat history with a visitor | Exists / No chat history | |
| Time on page | Greater / Less / Equals | Time in seconds. (last loaded page) |
| City | Equals / Contains / Is not | New York, Berlin, etc.. |
| Country | Equals / Is not | Spain, France, etc.. |
| Current Page URL | Equals / contains / Is not | URL (e.g. webpage.com/pricing.html) |
| Time spent this visit | Time in seconds. If the user visits the website and leaves/returns within 30 minutes, it's counted as the same visit |
|
| Number of page views (All pages of your website, this session) |
Greater / Less / Equals | Number |
| Number of sent proactive invitations (number of proactive chat messages sent before this moment) | Greater / Less / Equals | Number |
| Number of visits | Greater / Less / Equals | Number |
| OS / User agent (Is a string that is given to each website you visit, containing info about your browser version and operating system) |
Equals / Contains / Does not contain / Is not | Windows 10, Chrome 76.. |
| Platform | Desktop / mobile | |
| Rating | Equals / Is not | Great / Average / Poor |
| Referrer URL (The page the user came from, the one where they clicked the link) |
Equals / Contains / Is not | URL |
| Source URL | Equals / Contains / Is not | URL |
| Time before exit intent | Greater / Less / Equals | Time in seconds |
| Time with no reply from agent | Greater / Less / Equals | Time in seconds |
| Time since the chat widget was closed | Greater / Less / Equals | Time in seconds |
| Time since the last proactive invitation | Greater / Less / Equals | Time in seconds |
| UTM campaign (Used for keyword analysis. Use it to identify a specific product promotion or strategic campaign. Example: utm_campaign=spring_sale) |
Equals / Contains / Is no | Value |
| UTM content (Used for A/B testing and content-targeted ads. Use utm_content to differentiate ads or links that point to the same URL. Examples: logolink or textlink) |
Equals / Contains / Is no | Value |
| UTM medium (utm_medium is used to identify a medium such as email or cost-per-click. Example: cpc) |
Equals / Contains / Is no | Value |
| UTM Source (utm_source is used to identify a search engine, newsletter name, or other source. Example: Google) |
Equals / Contains / Is no | Value |
| UTM term (Used for paid search. Use utm_term to note the keywords for this ad. Example: running+shoes) |
Equals / Contains / Is no | Value |
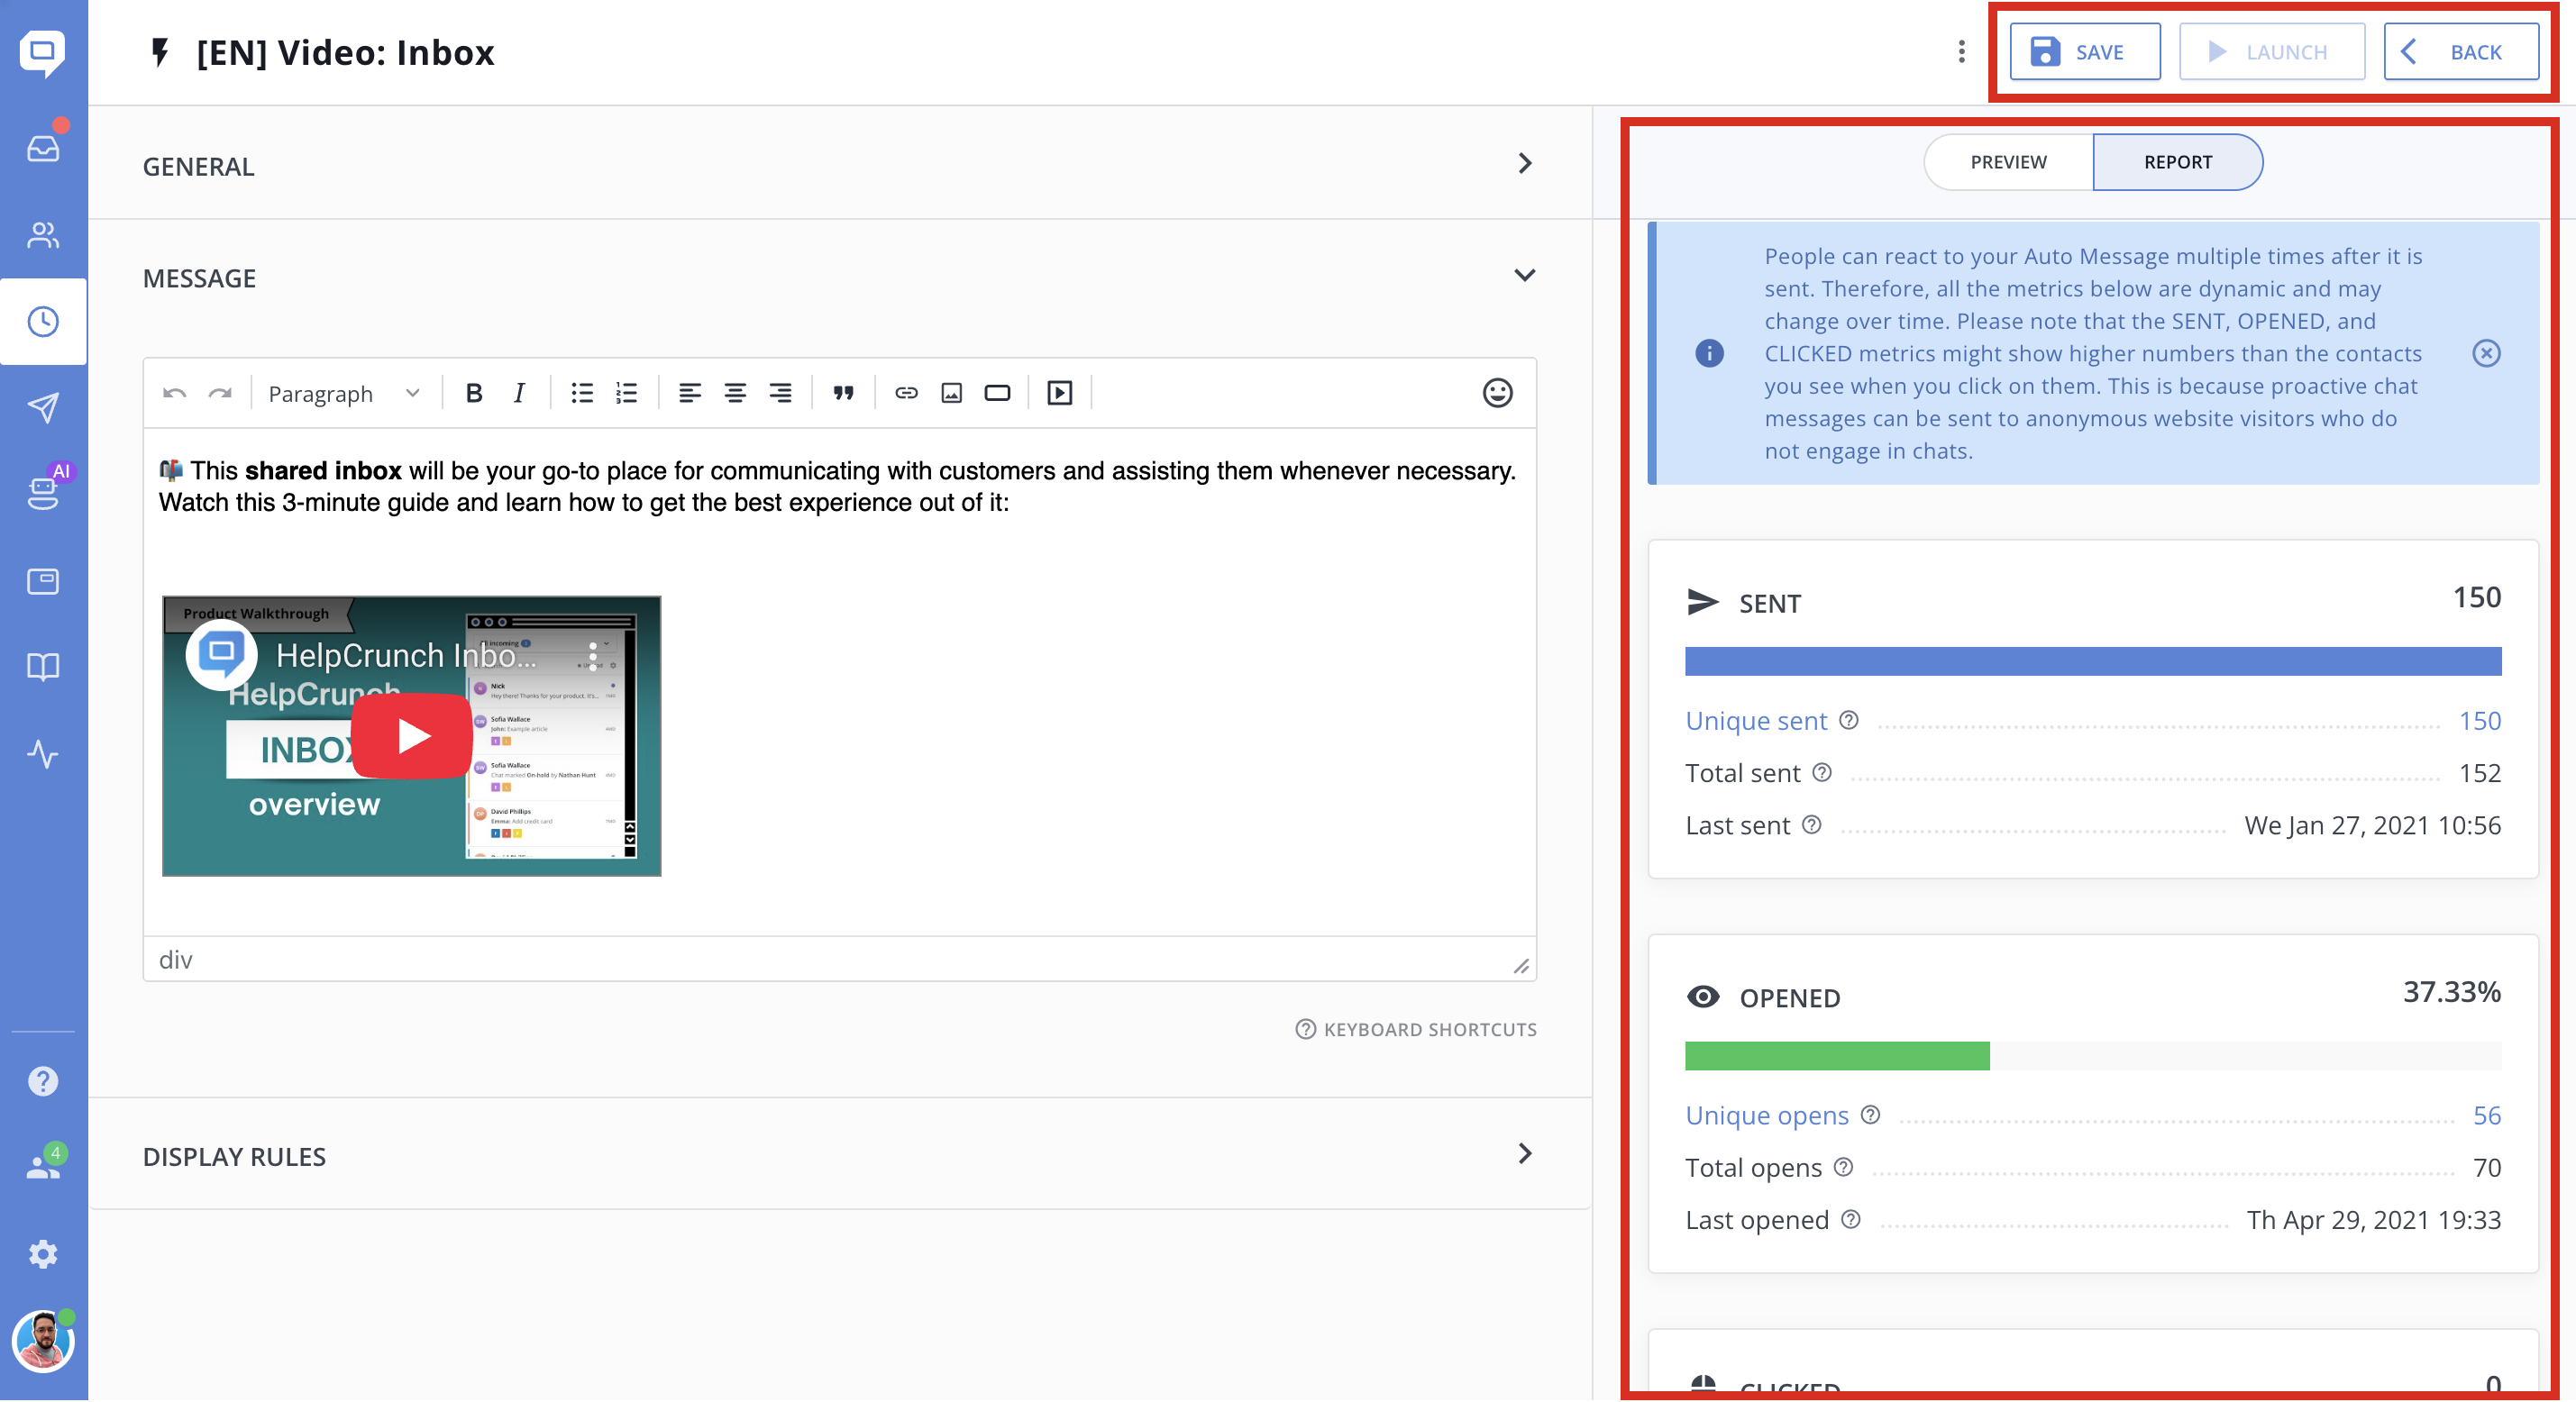
Step 6: Review, Save, and Activate
Once your content and rules are ready:
- Click Save to keep it as a draft or Launch to start sending immediately.
-
Track performance in the Report tab: opens, clicks, replies, and delivery rates.
Go ahead and create another one.
See also:
Send proactive chat auto-messages with JS API